Showing posts with label Manuf - Crafters Workshop Stencils. Show all posts

Sunday, April 7, 2013

Scrapbooking with Elle's Studio


12 x 12 Layout
 (click on layout for larger view)

Hello friends.  I found some time to scrapbook yesterday!  It's been a month since I've done any crafting and it was so wonderful to just relax and be creative for a change.

I'm loving the trend of "clustering" in scrapbooking.  I recently discovered a company that creates lots of little paper embellishments that are perfect for clustering.  Elle's Studio carries stamps as well and that sealed the deal for me. I LOVE that the sentiments / journaling are versatile and can be used for so many different photo themes.  

There are lots of opportunities to win free stuff over on the blog HERE.  I'm not sure if you are required to use Elle's Studio products in the sketch challenges or not.  It doesn't say you have to. This project is for their April 3 challenge to create a layout "using Elle's Studio tabbed tags as a frame".

There are weekly sketch challenges on Thursday's and other challenges on the 1st and 3rd Wednesday's.

For the layout above I used the following Elle's Studio products :

The Sweet Life Tidbits
The Sweet Life Snippets
The Sweet Life Cutouts
Serendipity 3" Circles
Daily Details stamp set

Washi Tape : My Mind's Eye "Lost and Found 3".    Patterned Paper : Pink Paislee "Portfolio".  
OLD supplies from my stash - Rub-ons by Scenic Route and 7 Gypsies "Fortunes".     Flower : Prima.

Cross your fingers and toes for me .... my wish list is long!

This layout was also designed for the sketch challenge over at Creative Scrapper.


*****************************************************************************************


12 x 12 Layout 
(click on layout for larger view)

I designed this one using a sketch from Delightful Inspiration.  

I used a stencil, modeling paste and acrylic paint to create the stars in the background.  Most of the embellishments used are stickers.  I did dig out some old chipboard stars as well.  Patterned paper and sticker embellishments are Fancy Pants "Park Bench".  I wish I had some of the other embellishments in this line!!  Love them!  Aren't those little paper bags / tags and buttons too stinken' cute.  But my LSS only had the paper and stickers.  


Mixed Media
I did get my March ATC's done for the 52 card Pick-up Class / group, but haven't had time to post them.  I think I took some step by step photo's so hopefully I will have a tutorial to share as well!

Cards
I'm working on some 10 minute cards for a Take Ten deadline.  So hope to share those soon as well.

Hope you have been finding lots of time to craft!  
hugs, Melisa

You can check out all my Scrapbook Layouts HERE.

Wednesday, February 20, 2013

Extreme Boy Layout


Hello friends!  Today I'm sharing more layouts I created for February challenges.   This is my son, Travis when he was 14.  He made it through the skateboard phase with only 1 ER visit.  We had a fabulous outdoor skateboard park in Jacksonville, Kona, with these HUGE, steep sided, concrete bowls.  Often I find myself taking a deep breathe and holding it as he took off down the side of one of them.  

I'm excited about this one because I used a really old stamp set that I had never used, "Extreme Boy" by Junkitz.  I also used "Stars of Worn" by Unity, and a distressed tags from the "Timeless Tags" set by Stampendous.  I combined those with some fun Basic Grey "Fact" paper pad and Die Cuts / Transparencies paper embellishments (yellow and green tickets).  I used a star stencil as well.


I was inspired by a sketch over at Sketches with a Twist.


And I added orange tinted (mixed with acrylic paint) modeling paste for a challenge over at 2Peas's.


Other challenges I'm linking to :

Inspired by : (thur)


Stampin for the Weekend ( fri) : distressing.  I distressed the edges with black ink.

Basic Grey Challenges (sat) : "favorite ..."  One of my son's favorite things to do growing up was skateboarding

Sweet Stampin' Challenge blog (sat) : stars and stripes


You can view all of my Scrapbook Layouts HERE.
You can view my Mini Albums HERE.


Thursday, January 31, 2013

Mixed Media Cupcake Canvas'


Hello mixed media friends.  Today I am excited to finally sharing the 4 cupcake canvas' I created earlier in the month.  I was holding off because I felt like they were not quite finished.  I want to add some words or phrases, but never got around to it.  So I figured it was best to go ahead and share them as is for now.  The canvas' are 8 x 8 and I did them in colors to match my studio.  I'm going to arrange them in a square.


I had sooooo much fun creating them.  Of course looking back, realized things I would not do if I had to do it again.  But still found great joy in the creative process for these canvas' and I hope you are inspired to create one of your own and share it with me.  I'm including photo's of each project at the 1/2 way point as well.  

CANVAS #2


The techniques I used for creating the layered / dreamy background was learned in a class called "Art Journal Conversion" by Roben-Marie Smith.  While using these mediums were not new to me, it was the use of them that completely inspired me and is now one of my favorite mixed media techniques.  Roben shows you how to build multiple layers of spray inks with stencils, and gesso to get that dreamy effect.  I'm including photo's at the 1/2 way point of creation as well.


CANVAS #3


The cupcakes are hand drawn patterns.  I paper pieced them and then added the icing (thick tachy glue -Aleene's with glitter sprinkled on top)


I learned a lot doing these canvas'.  
#1 plan out what you are going to put on your backgrounds and visually lay it out, so you can see where you might want to place your modeling paste shapes.  
#2  I love the circles and flowers with the cupcakes ....  but wasn't crazy about the style of the 2 swirly stencils and ended up trying to cover them up with circles.  


If you have any specific questions about any of the backgrounds ..... shoot me an email.


Here's a close-up so you can see the texture the modeling paste adds !


Thanks so much for stopping by today!!  I will have so many more projects (Mixed Media, Scrapbooking, Cards, and ATC's) to share with you in 2012 so I hope you will stop by again.  If you want to receive my post via email, it's easy!  Just enter your email address in the sign-up box on the side-bar.  You can unsubscribe at any time.  

If you are interested in checking out all my Mixed Media projects Click HERE.

Projects with background tutorials can be found HERE.

I just set up a new page with a list of mixed media classes I have taken and why I liked them.  You can find the link with the tabs along the top of my blog.  If you have any classes you have taken and enjoyed .... I would love to here about them.


I have to share one more thing .... I just signed up for Stephanie Ackerman's "52 Card Pick Up" Class.  Wanna check it out??  Visit Stephanie's blog HERE.


I just set up a new page with a list of mixed media classes I have taken and why I liked them.  You can find the link with the tabs along the top of my blog.  If you have any classes you have taken and enjoyed .... I would love to here about them.

Sunday, April 22, 2012

Mixed Media Project - Roben- Marie Smith Class

6" x 9"


Hello Paper Crafters.  I recently finished a mixed media class by Roben-Marie Smith called "Art Journal Conversion" and wanted to share my first two projects with you.  This one just makes me smile.  I still need to add the journaling, but couldn't wait to share it.  I seriously can't believe I made this!!  I LOVE Roben's style and I'm so excited that she has classes to teach the rest of us how to get that wonderful layered look.  I really enjoyed the class.  It used a lot of products I already owned and honestly, the techniques were not new to me (spray inks, stencils, modeling paste, doodling).  What I gained from the class was the inspiration to add MANY layers of spray inks and gesso so that you create a depth.  So much is going on in the background, but it is so subtle that it doesn't overwhelm.  The medium I was introduced to was using oil pastels.  LOVE them.  It really allows you to add shading.  Be prepared to use your fingers,  A LOT, in this class.  If you don't like a mess, then this is not the class for you. 

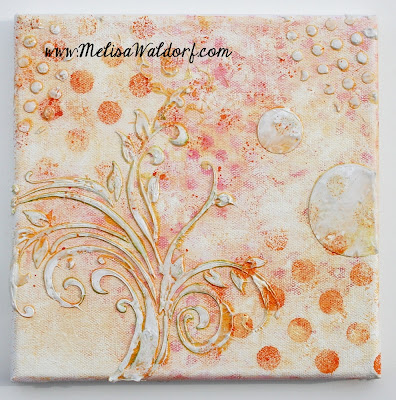
The stencils I used were : Plaid (diamond pattern), Layers of Color (swirly), Crafter's Workshop (dots), and the daisy is from Hobby Lobby HERE, sorry I didn't save the package.  The larger circles are from a Drafting Stencils that has a lot of circles with different sizes, but they are graduated.  So it's a pain to use.  HERE.  I wish someone made one with lots of different circle, in differnet sizes, randomly. 

Here are a list of sites that I found that have really cool stencils though :

Martha Stewart at Michaels  - I LOVE this one, but haven't seen it at my local Micheals.  Will have to see if I can order it.

Plaid  check out the Folk art catagory.  Their store is a little weird to navigate.  Once you get to the Folk Art section, then you have to look to the right and you will see smaller photo's of options and can arrow over.  Then click on the stencil you want to see.  REALLY cool stencils.

I-Stencils - I linked you to the background stencils but check out the left column for other choices.  You can order from their online store, but I don't see any shipping details.


Options for Spray Inks :
Adirondack
Dylusions
Glimmer Mist
Ranger Perfect Pearls
Mister Huey
Inkadinkado
And I'm liking the less expensive RIT liquid dye (liquid, already mixed).  I purchased an .99 cent spray bottle from the artist section at Hobby Lobby and just poured the color in.

Let me know if you think of any others I can add to the list
I started shopping around looking for other options for spray inks.  Glimmer Mist are so pretty, but mine often clog and for what I'm paying for them, I find that frustrating.  Roben used some SEI Tumbler Tie-dye inks, so I decided to check out the tie-dye section of Jo-ann's where I noticed the RIT dyes.  SOOOO much cheaper than Glimmer Mist ($7.50 for 2 oz).  I bought them pre-mixed in a bottle (8oz).  I think it was around $4.  Then I picked up some inexpensive spray bottles at Hobby Lobby and poured the color in those.  So I decided to give it a try.  The orange you see in this project is the RIT.  I will definitely try some of the other colors.

I didn't want to start out working in my art journal, because I figured my first project might not be so good.  So I did this piece on 6" x 9" 140# watercolor paper and decided to hang it on my 7 Gypsies Photo Display Stand.  I don't have any photo's on mine.  It's dedicated to mixed media projects.  Here is a picture I posted in the past :


I spray painted mine black.  I use extra large eyelets in the top.


2.5" x 3" Artist Trading Card

This one is a mini.  You can't really get the depth on such a small peice, but I like how it turned out.
If you are interested in taking mixed media classes, here's a list :
Donna Downey - tons of free video's on her blog HERE
and in her store HERE
Free video's at Cloth, Paper, Scissors HERE
If you know of any that aren't on my list, please share!

You can view my other :
 Faith Art projects HERE.
Collage / Mixed Media projects HERE.
Artist Trading Cards HERE.


***********************************************************

Challenges

Project #1
Cupcake Craft (mon) - texture (flowers and circles are modeling paste)
Ribbon Carousel (tues) - lots of color
For Fun (wed) - anything goes
Let's Ink it Up (monthly) - distressing
Crafts 4 Eternity (fri) - try something new (new mixed media class - style)
Corrosive (sun) - from a bottle  (spray inks)

Project #2
Word Art Wed (wed) - Habakkuk 3:18
OOzak's (monthly) - anything goes

Saturday, March 31, 2012

Artist Trading Card / Faith Art

Artist Trading Card 2.5" x 3.5"

Today I have an Artist Trading Card designed for this weeks Word Art Wednesday challenge.  Cass provides free word art each week for us to use in our projects.  Thanks Cass!!  I had fun getting my fingers messy with this one. 
hugs to you all!
Melisa

*****************************************************

Project Details

Trim watercolor paper to ATC size.  Mine is a longer than 3 1/2 because it's for my revolving ATC holder so I can extend things over the edges.  Stamp heart image (Hampton Arts) with VersaMark ink and heat emboss with clear embossing powder.  Brush on red watercolor paint (VanGough Permanent Red Deep) and blot some area's with paper towel so that it's not a solid color.  Let the first coat dry and then apply another coat.  Draw circles using a stencil (Crafter's Workshop).  Paint random dots black (Lyra Watercolor Crayon).  Paint around heart with black ink, smearing as you to.  Grunge up the heart a little by smearing on a very small amount of black here and there.  Create a mask (Eclipse Masking Tape) and carefully splatter on white watered down acrylic paint by loading a paint brush and flicking it over the ATC.  Ink edges with black ink and doodle.  Wrap with black twine and tie knot.  Adhere to revolving atc holder card.  Print word art, trim, ink edges, doodle and staple with Tim Holtz Tiny Attacher.  Embellish with stick pin (Maya Road) and trim (Hobby Lobby).  Print "true love", trim, ink edges, trim along top with deckled scissors and staple with Tiny Attacher.

**************************************************

Challenges

Word Art Wednesday
Southern Girls - focus on sentiment

You can check out my huge list of daily challenges by clicking on the "Challenges" tab at the top of my blog.  Let me know if I have missed any!


You can view all of my ATC's HERE
You can view more of my Faith Art HERE.

Thursday, March 15, 2012

GinaK Designs "Springtime Silhouettes"


I have received several fun GinaK sets the last few months and just didn't have time to play with them. So that is my goal this month.  The cards I'm sharing today are designed using a set called "Springtime Silhouettes".  It's a fun set that includes images and sentiments for lots of occasions.  I love that the stamps are solid.  So you can whip up cards really quick.


Thanks for stopping by!!
Melisa

You can view all of my GinaK Designs projects HERE.

********************************************************

Project Details

Card #1
Stamps : GinaK Designs "Springtime Silhouettes"
Ink : Tsukineko Brilliance Pearlescent Chocolate
Die : Cheery Lynn Designs "Mega Fanciful Flourish"
Scissors : Fiskars Deckled

Adhere card to a larger piece of brown cardstock and trim around edgs with deckled scissors.  Trim patterned paper, ink edges, and adhere.  Cut 2 brown vines.  Cut 1 apart and use to add an extra swirl and leaves to the first one.  Stamp images with brown ink on cream cardstock, trim, and adhere.  Stamp sentiment.


Card #2
Stamps : GinaK Designs "Springtime Silhouettes"
Ink : Tsukineko Brilliance Pearlescent Chocolate and Pixie Dust
Stencil : Crafter's Workshop
Border Punch : Fiskars
Stick Pin : Making Memories
Embossing Folder Cuttlebug

Trim brown cardstock and adhere to card front.  Trim cream cardstock, emboss, ink edges, and adhere to card front.  Trim cream cardstock, emboss, ink edges, and adhere to card front.  Trim cream cardstock 3 1/4" x 4".  Apply pink ink over polka dot stencil, then ink edges with brown ink.  Tie a knot and wrap ends of brown ribbon around edges of panel.  Mat on pink cardstock.  Cut brown strip at least 3 1/2" wide and punch scalloped border on 1 end.  Adhere other panel and then trim 3 edges with deckled scissors.  Stamp sentiment with brown ink.  Stamp image with brown ink on cream cardstock, trim, and adhere.  Embellish with stick pin. 


Thursday, February 23, 2012

Artist Trading Card / Mark's Finest Papers

2.5" x 3.5" Artist Trading Card

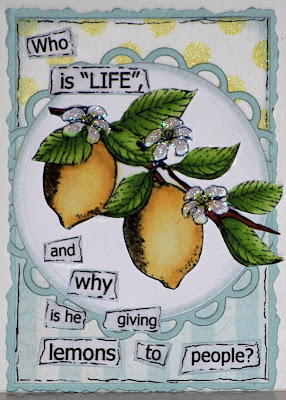
I'm back today using "Pucker Up".  This time I created an ATC.  I also used one of my new stencils by Crafter's Workshop "Mini Swiss Stamps".  I sprayed some "Daffodil" Glimmer Mist over it onto water color paper.   This is a FUN set!
I hope you haven't had any lemons thrown your way this week!
Melisa

*************************************************

Project Details
Stamps : Mark's Finest Papers "Pucker Up"
Spellbinders : "Standard Circles", and "Lacey Circles"


You can view all of my ATC's HERE


Thursday, February 9, 2012

Mark's Finest Paper's Pucker UP


Today I'm sharing another card I designed using "Pucker Up" by Mark's Finest Papers.  Isn't this a cute sentiment.  I used Glimmer Mist - Lemongrass with a Crafter's Workshop stencil (Mini Swiss Dots) to create the polka dot background.  Then I soaked up the excess with the crepe paper.  I used water color paper and sprayed one area solid yellow to use for the lemons.  Then I added a darker shade of yellow with a water color crayon to add some depth.


The lemons on the inside were cut from a copy of my master board.
Hope your having a crafty week!
Melisa

*****************************************************
Project Details
Pattered Paper is from one of my My Mind's Eyes 6 x 6 paper pads
Glitter Mist Lemongrass
Glitter Glue over flowers
Ribbon - unknown
pearls - Hobby Lobby

****************************************************

Challenges

Mark's Finest Papers - spray mist
Papertake Weekly - Anything Goes
ABC - 2 of something (2 lemons)
Related Posts Plugin for WordPress, Blogger...