Showing posts with label Manuf - Sweet 'n Sassy. Show all posts

Monday, November 25, 2013

Sweet n' Sassy's "Christmas Joy"


Day 2 of my daily post with Christmas card inspiration using some of my favorite stamp images. This one is designed using "Christmas Joy" by Sweet n' Sassy.  This one would be pretty quick and easy to put together.  I cut the doily from tissue paper using "Nautical Wheeler Doily" by Cheery Lynn Designs.  This may become one of my all- time most used dies.  LOVE doily's.  I colored the the bird using R29, R46, and R89.  I used E23, E25, and E19 for the branch / pine cone.  I added a little Stickles to the branch and pine cone to create a little snow.

I love sending cards.  I can't make any promised because I'm not sure how many cards I will get done on my trip ... but if I don't already have your address and you would like to receive a Christmas card from me :
Email me your address and birthday to luv_2_stamp@yahoo.com

I will be back tomorrow with another Christmas card.
Thanks for stopping by!
hugs, Melisa

You can check out all my Sweet n' Sassy projects HERE.
You can check out all my Christmas projects HERE.


Wednesday, October 23, 2013

Sweet n' Sassy "Bookmarks and Bits"


Guess what ???  My daughter is coming to visit!!!   I'm so excited.  She and her boyfriend, David are flying in from Colorado and visiting for a week.  So today I'm sharing the bookmarks I made for her 5th grade class.  As soon as I seen Sweet n' Sassy's "Bookmarks and Bits" I had to have it.  Aren't these images so cute!!

I do need to give some credit though.  I only designed 3 of them.  The cute one with the paper air planes was designed by Bridget @ "Bridget's Paper Blessings" HERE.


Have a great day!
hugs, Melisa


Tuesday, February 5, 2013

Sweet 'n Sassy "Flowers in Bloom"


Hello stampers.  Today I'm sharing a card created using Sweet 'n Sassy "Flowers in Bloom".  Love those flowers!  And I love that sentiment.  I hope you are all having a fabulous week so far.

I'm excited because tomorrow is the day I meet with my painting group.  I'm working on an oil painting.  Still haven't actually done a canvas yet.  I just feel like I want to get better at it before I actually do a canvas.  So I'm still practicing.  I have to say learning to oil    paint is one of the hardest crafty activities I've ever tried.  I haven't really worked on it the last year like I had intended when I started this journey.  But last month I started going back to my wednesday group and that's keeping me on track with at least working on something once a week.  Maybe I will have the courage to share with you some day.

I have been working on some Faith art this week which was inspired by taking Stephanie Ackerman's Class.          We are supposed to create 1 a week.  I will share mine 4 at a time, once monthly.  2 down, 2 to go!  I also have a card set to share that shows creative ways to use paint on your cards.  So be looking for that one as well.

Have a blessed day!!
hugs, Melisa

*********************************************************

Project Details

Patterned Paper : Authentique 6 x 6 paper pad
Copic Markers
Deckled Scissors - Fiskars    Border Punch - Martha Stewart
Spellbinders Labels Eight Nestibilities

Adhere patterned paper to card front.  Trim patterned paper 1 7/8" x 5 1/2".  Punch border from black cardstock and adhere along edge of panel.  Adhere black cardstock to panel and trim with deckled scissors.  Adhere panel to card front.  Stamp image on white cardstock and color.  Cut white cardstock with Spellbinders Nestibilities die.  Adhere to panel to card front.  Stamp sentiment and adhere to card front.

Wednesday, October 24, 2012

Sweet n' Sassy - "Autumn Bounty"


Good Morning!  Today I'm sharing a CAS card.  I used "Autumn Beauty" by Sweet n' Sassy Stamps.

Tomorrow I'm sharing a background tutorial, so I hope you will join me.

Have a great day!
Melisa

You can check out all my Fall / Thanksgiving projects HERE.

***************************************************

Project Details

Stamps : Sweet 'n Sassy "Autumn Bounty"
Copic Markers : YR20, YR15, E57 (pumpkins)  YR15, E97, E57 (flower) Y00, Y15, E43 (sunflowers)  YG61, G24, G99 (leaves)  E40, E41 (vase)  E23, E57 (ribbon)

Stamp floral image on card front and on Eclipse Masking Tape.  Trim image along left side of image on masking tape and cover image on card front.  Stamp pumpkin image then remove maskig tape.  Color with markers.  Stamp sentiment.  Embellish with ribbon.

****************************************************

Challenges

Kaboodle (mon) - anything fall
Love to Create (mon) - pumpkins
Hand Stamped Sentiments (tues) - photo inspiration


Craft Us Crazy (thur)- fall into the season


Monday, August 20, 2012

Sweet n' Sassy's "Flowers in Bloom"


Good morning stampers!  Today I am sharing a card I created using the Sweet n' Sassy sketch challenge over at The Sweet Stop.  It was just posted saturday, so you have plenty of time to play along.  I used Sweet n' Sassy's "Flowers in Bloom" for this one.


I used "Flowers in Bloom", my Neocolor watercolor crayons, and my Niji Waterbrush (Joann's Crafts).

Thanks for stopping by!
Melisa

**************************************************

Challenges

The Sweet Stop  (sat) - sketch plus a diecut or punch


Word Art Wednesday  (wed)  - "Let us always meet each other with a smile, for the smile is the beginning of love"  Mother Teresa.   When I read this, I thought of friendship and the joy that it brings to our lives.  So this stamp set seemed perfect for this challenge.

Corrosive (sun) - cute image and a button

Crafty Creations (wed) - color challenge - yellow, blue, and green

Creative Belli (wed)- winged things - use something old and forgotten -  I used really old DP for the yellow patterned paper panel, an old button and lace from my stash.

Whoopsi Daisy (mon) - Include a sentiment

The Crazy Challenge (mon) - anything goes

Monday, August 13, 2012

Sweet 'n Sassy Cards


Yellow has never been one of my favorite colors, but as soon as I seen this paper pad at Hobby Lobby last week I had to have it.  It's by Authentique.   "Everyday Miracles" is a wonderful encouragment stamp set.  And you know I love those butterflies!


This card was featured as a top 3 at Sentimental Sundays!!


Have you seen the August new releases over at Sweet n' Sassy??  I'm in LOVE with the Autumn Collage!!


So I grabbed a couple of my Sweet n' Sassy stamp sets and these are the results!  These are pretty clean and simple.  The coloring took the most time.

I love the "Praising the Lord" set because of the wonderful sentiments in it.  This week I am praising the Lord for a new job opportunity and for my sweet husband who I love so much!  How is God blessing you in your life??

You can view all of my Sweet n' Sassy projects HERE.


***************************************

Project Details 

Card #1

Stamps : Sweet 'n Sassy - "Everyday Miracles"
Patterned Paper : Authentique 6 x 6 paper pad (Hobby Lobby)
Copic Markers
Deckled Scissors - Fiskars  Border     Punch :EK Success
Spellbinders Labels Fourteen Nesitblities
Trim : Hobby Lobby

Trim patterned paper 3 3/8" x 5 1/2".  Punch scalloped border and adhere along bottom edge of panel.  Adhere yellow cardstock to top edge and then trim with deckled scissors.  Adhere panel to card front.  Adhere trim.  Cut white cardstock with Spellbinders Nestibilities and stamp sentiment.  Stamp butterfly antenna's on label and butterfly on white cardstock.  Color butterfly, trim and adhere to label.  Adhere label to card front.


Card #2

Stamps : Sweet n' Sassy "Praise the Lord"
Patterned Paper : Authentique 6 x 6" paper pad (Hobby Lobby)
Copic Markers
Spellbinders Labels Two Nestibilities

Trim patterned paper 4 1/4" x 4 1/2" and adhere to card front.  Stamp image and sentiment on white cardstock color, and adhere to card front.  Adhere trim.

*********************************************

Challenges

Card #1
Craft Your Passion - bugs (butterfly)
One Stitch at a Time - Anything Goes
Sentimental Sundays - Clean and Simple with a sentiment

Card #2
Stampin' Sisters in Christ - Home (a bird's home is in a tree)
Charisma Cards - flowers and an animal
Skipping Stone - sketch
Word Art Wednesday - scripture challenge
"Rejoice in the Lord O ye righteous, for praise is comely for the upright" Ps 33:1

Monday, April 23, 2012

Sweet n' Sassy "Bee Happy Rhubarb"


Good Morning Stampers!  Today I am sharing another cutie patootie from Sweet 'n Sassy.  I also want to let you know about the beary awesome sale Sweet 'n Sassy has going on until Wed.  40% OFF!! everything!!  Check out the details HERESo if you have been thinking about picking up some Sweet 'n Sassy, now's the time to do it.  I got my order in on Sunday.  This one was designed using the sketch challenge over at the Sweet Stop Sketch Challenge Blog HERE.  A new challenge is posted every saturday.  But if digital images are more your style, then you can play along on the Sweet 'n Sassy Digi Challenge Blog HERE for a chance at winning some fabulous images!

I hope you have a beary nice week!
hugs, Melisa

You can view all of my Sweet n' Sassy projects HERE.

*********************************************************************

Project Details
Stamps : Sweet 'n Sassy "Bee Happy Rhubarb"
Patterned Paper : My Mind's Eye Lost and Found - Madison Ave.  6 x 6 paper pad (you can get this one at Hobby Lobby)
Copic Markers E23, E25, E59  RV11, R81,  E53 (ears, nose, bee-hive)
Glitter Glue : Stickles - Cotton Candy 
Spellbinders Lacey Circles die and 1 3/4" Paper Shapers Punch
Hand Cut scalloped border using a chipboard peice as a guideline

************************************************************************

Challenges


Corrosive (sun) - from a bottle (glitter glue)
Paper Sundaes (sun) - let's get cute
Stamptacular Sunday (sun) - loads of layers
The Crazy Challenge (mon) - girly
Paperplay (thur) - animals
Crafty Catz (fri) - stripes
Fussy and Fancy (fri) - Punches and dies
Secret Crafter (sat) - movie title "Winnie the Pooh"
By the Cute and Girly (monthly) - Winnie the Pooh

Tuesday, April 17, 2012

Sweet 'n Sassy "Owl Be There"


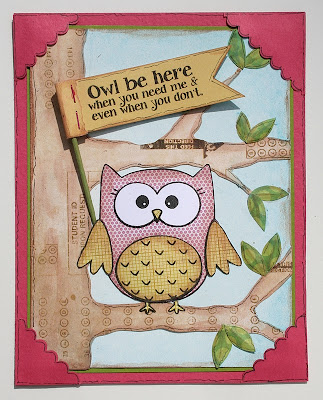
Hello Paper Crafters!  I'm back today with another card created using "Owl Be There" by Sweet N Sassy.   Lots of paper piecing on this one, but it really doesn't take long.  I bought some PanPastels a while back and  wanted to try them so I used them to create the sky.  Basically you use a spongy pad, kinda like a make-up pad and rub them on.  They are ok, but not sure I would buy more.   I could brush blue water color paint on for a lot cheaper.  The rest was paper pieced.  I used my brown NeoColor II watercolor crayon around edges, on tree, and around all other pieces. 

thanks for stopping by!
Owl be back next tuesday with my next Sweet n Sassy project!
Melisa

You can view all of my Sweet n' Sassy projects HERE.


***************************************************
  
Project Details
Stamps : Sweet 'n Sassy "Owl Be There"
Colorization : PanPastels, "Turquoise Tint" and "Turquoise"
NeoColor II Brown #59
Patterned Paper : Bo-Bunny 12 x 12 Et Cetera Ledger (tree), My Mind's Eye 6 x 6 paper pad - Blush II (pink polka dot) and Lime Twist (green polka dots), Basic Grey 6 x6 paper pad "Origins" 2009 (yellow).
Scalloped Scissors : Fiskars
Mini Attacher / Stamples : Tim Holtz
tooth pick

*************************************************
Challenges
Love to Create (mon) - friends
What if ? (wed) - birds of a feather
Totally Paper Crafts (fri) - things with wings
Wags N Whiskars (fri) - anything goes

I WON!!!
 I won $10 free digi's from Digi Doodle Shop

Tuesday, April 10, 2012

Sweet 'n Sassy's "Owl Be There"


Good Morning Paper Crafters. Today I'm sharing the other 2 cards I created using "Owl Be There" by Sweet 'n Sassy.   Such a cute little friendship set.  I was inspired to create these when I saw a Color Throwdown challenge posted last week, to use the colors from the Mabel paper pad by My Mind's Eye.  If you are like me you have a pile of those little 6 x 6 paper pads laying around. The small paper pads are perfect for paper piecing stamped images because the patterns are so small. So think of all the options for creating your own little set of cards using this set and your paper pads.  


Soooooo many possibilites with this image!  Wouldn't the image be cute with a little bow on the head for a girl, oh and what about a party hat??? That would make a great birthday card! You could have him sitting on top of a birthday gift. I'm trying to think of other things we could tuck under his wing .... what about a book and a graduates hat on his head .... or a balloon.

Another great idea would be to put two of them standing side by side with their wings touching so they look like they are holding hands. There just may be enough room between the wings to have him holding a banner. We can have a lot of fun with this little guy!

I'd love to know what idea's you have. If you would like to share an idea or a card you created using this little guy just leave me a comment with a link to your card.

Hope you're day is a hoot!
hugs, Melisa

You can view all of my Sweet n' Sassy projects HERE.

*************************************************

Project Details
Stamps : Sweet N' Sassy "Owl Be There"
Patterned Paper : My Mind's Eye 6x6 paper pad "Mabel"
Cardboard Flowers : Jillibean Soup
Buttons : Papertrey Ink
Embossing Folder : Cuttlebug
Border Punch : Fiskars
Spellbinders Classic Oval dies
Mini Stapler : Ranger
Card #1
Create a top from cream cardstock.  Emboss card front with embossing folder.  Trim patterned paper 1" x 4 1/4".  Punch scalloped border.  Adhere together and wrap with twine, threading through buttons as you wrap.  Adhere panel to card front.  Stamp owl and paper piece.  Paint tooth pick.  Stamp sentiment on patterned paper and trim creating a flag.  Wrap end of flag around tooth pick and staple with mini stapler.  Adhere owl and flag to card front.  Doodle around edges.
Card #2
Trim cream cardstock 4 1/4" x 5 1/2", emboss, and adhere to card front.  Trim floral patterned paper panel 2 1/4" x 4 1/2".  Punch scalloped border.  Stamp owl, and paper piece.  Adhere buttons to center of cardboard flowers.  Cut oval with Spellbinders oval die.  Stamp sentiment.  Adhere all pieces to card front.  Doodle around edges.

*************************************************
Challenges
Paper Sundaes (sun) - kraft / diecut (flowers and circle)
4 Crafty Chicks (thur) - flowers
CCEE (thur) - embossing folder
Charisma Cardz (thur) - chipboard
Stamp, Scrap, and Doodle (sat) - things with wings
ABC - anything goes
Stampendous - re-use, re-purpose (tooth pick)
Cupcake Craft (mon) - spring is in the air
Splitcoast Stampers (mon) - scallops

*********************************************

Card #2 was featured at :

Sunday, April 8, 2012

Sweet n' Sassy "Owl Be There"


This is another one of the new releases from Sweet 'n Sassy this month, "Owl Be There"!  Another cutie patootie!   It's so much fun to paper piece this little guy.  This is a card from a 3 card set I am sending to Take Ten for their Variation on a Theme.  I will be sharing the other 2 on tuesday.  See ya then!

You can view all of my Sweet n' Sassy projects HERE.

******************************************************

Project Details
Stamps : Sweet N' Sassy "Owl Be There"
Patterned Paper : My Mind's Eye 6x6 paper pad "Mabel"
Buttons : Papertrey Ink
Embossing Folder : Cuttlebug
Border Punch : Fiskars
Create a top-fold card from cream cardstock. Emboss card front with embossing folder. Trim patterned paper 2 1/4" x 4 1/4". Punch scalloped border from patterned paper and adhere along top of othere panel. Wrap with twine and tie bow. Adhere to card front. Stamp owl and paper piece. Stamp sentiment on cream cardstock, trim creating a flag, and adhere button. Adhere owl and flag to card front. Doodle around edges.

***************************************************

Challenges

My Mum's Craft Shop (wed) - animals
Papercraft Star (wed) - anything goes
Fab N Funky (wed) - embossing
Crafty Catz (fri) - clean and simple
Color Throwdown (wed) - color challenge

Thursday, April 5, 2012

Altered Photo Frame


Welcome to the Sweet 'n Sassy Stamps April New Release Celebration!  I"m so excited to be the guest designer this month for Sweet N Sassy and I had so much fun playing with 2 of the new release sets!!  Today I"m sharing an altered acrylic frame using "Bee Happy Rhubarb".  The images from the set that I used are Rhubarb, the sentiment and the little bee's.  The flowers, sun and border were hand drawn.  And the little cutie in the photo is my son 22 years ago.  Boy how time flies.  If I could just kiss those little chubby cheeks one more time ....  I know there will many more inspirational projects during the hop, so take a minute to hop around and then join in the party over at SCS.


Here's the full list of Design Divas (and our special April Guest) sharing their creativity with you today.  Just click on the name to go to their blogs:

Melisa Waldorf  YOU ARE HERE

Make plans to join Sweet N Sassy tonight over on the member company forums on Splitcoaststampers for our New Release Party!  They will have full reveals of each fabulous stamp set, fellowship and chatter with friends, fun challenges, and more!  Also.....did you know today is Korin's birthday?!  Isn't that fun?  To celebrate, Sweet 'n Sassy Stamps will be giving away a $34 gift certificate to the store.  All you have to do is leave Korin some birthday wishes over on this photo on the Sweet 'n Sassy Stamps Facebook page

Pin It

You can view all of my Sweet n' Sassy projects HERE.
You can view all my altered photo frames HERE.


***********************************************

Project Details
Stamps : Sweet N Sassy "Bee Happy Rhubarb"
Patterned Paper : My Mind's Eye 6 x 6 paper pad "Lime Twist"
Copics : Y00, Y11, E23 (yellows)
E23, E25, E29 (dark brown fur)
E53, E23 (light brown fur)
Glitter Glue : Stickles Frosted Lace
Cut frame from blue patterned paper.  Doodle around edges.  Place it over white cardstock and draw a scalloped border on the outside and straight edge on the inside.  I started with by drawing light lines with a pencil, then with a black marker.  Color the borders with yellow Copics.  Trim.  Adhere both together.  Adhere to front of acrylic frame.  Stamp bear, color, and trim.  Hand draw flowers and sun on white cardstock, color, and trim.  Adhere to front of frame.  Stamp sentiment.  Doodle flower stems and leaves.  Color leaves with green pigment ink using a Dove Blender Pen.  Stamp bees.

*********************************************

Challenges

Stampin' for the Weekend (fri)- bug (I think a bee is a bug)
Scrap, Stamp, and Doodle (sat)- spring
City Crafters (tues) - hat

Friday, April 30, 2010

Sweet 'n Sassy Birthday card


Good Morning!  Today I'm sharing one of Sweet 'n Sassy's digital images Chocoholic.   I needed another birthday card, so I had to create my own sentiment in a word document.  Looking at this makes me hungry, teehee.  It's been soooo long since I've had chocolate, but I've lost 20lbs!!  So it has been worth the to resist.

Thanks for stopping by!
Melisa

You can view more of my projects using Digital Images / Stamps HERE.
You can view more of my Sweet N Sassy projects HERE.
You can view more of my Birthday project HERE.

Wednesday, April 14, 2010

Sweet 'n Sassy Friendship Card


Good Morning.  Time has flown my and it's time for another Creative Belli Challenge!
The Challenge : Die Cuts  I used a Spellbinders Die this one.
The Belli girls are showcasing Sweet 'n Sassy Digital images this week as well.
They are our Sponsor this week, so I know there will be an awesome prize involved, so come play along!

You can view more of my projects using Digital Images / Stamps HERE.
You can view more of my Sweet N Sassy projects HERE.
You can view more of my friendship themed projects HERE.
You can view more of my floral projects HERE.
Related Posts Plugin for WordPress, Blogger...