Showing posts with label Medium - Clay. Show all posts

Friday, October 12, 2012

Mixed Media Cardboard Art Tutorial


Hello mixed media fans.  Today I"m sharing an altered cardboard project I created a while back after taking a class called "Burlap and Clay by Sue Pelletier.  Sue is a very talented and published mixed media artist and you can check out more of her artwork on her blog HERE.   


The class I took from her was offered on her NING site HERE.  You can email her with questions at sue38wood@comcast.net to find out how to purchase the class.


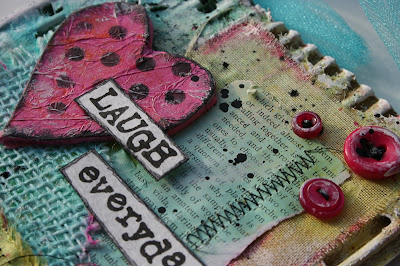
Lots of texture on this project !  I used white burlap and "crinoline" from Joann's Fabric store, along with paper clay, cardboard, and tissue paper.  


I'm going to share some step by step photo's of  how I created the background since my background / style is so different from Sue's.  Basically what I took away from the class was the idea to use burlap / crinoline / and clay on my project and then made it my own, using some of my favorite mediums.

Before I share the details of my project, I want to share with you Sue's new online video class, available over at "Creative Workshops".  I haven't taken it yet, but hope to do so soon.  These canvas's are so cool and she uses plaster, a medium I have never worked with.    Sue has her own unique style!  I have to say I haven't seen anything like this out there yet.

**************************************************

Project Details


I started with 3 pieces of corrugated cardboard and tore away peices of the to layer.  I added some white paint here and there, then sprayed with blue and yellow ink.  


I distressed the background use my Rollagraph - Clear Snap Stamp Wheel.  I like it because it's easy to apply the image here and there randomly, without applying the full image.  


Then I designed where I wanted the burlap / crinoline / and book paper on each panel.  I sprayed the crinoline and burlap with spray inks, and added some stitching.


Then adhered the pieces to each panel.


I rolled out my paper clay and cut my heart shapes.  After the clay air dryed, I painted the hearts pink.  Then I decided I wanted more texture so I used another one of my favorite mediums ... tissue paper.  I adhere pink tissue paper over each heart, purposely wrinkling it up.  


I made them look more distressed by lightly rubbing on some white acrylic paint randomly, and then black ink.  Then I used stencils to add polkadots to some of them.  


After adhering clay hearts and words, I splattered with black paint.

Lots of messy fun with this project!!  Hope you are inspired to create your own corrugated cardboard art project.  You can view more of my cardboard art HERE if you want .   And I started a "Corrugated Cardboard" art group over on Flickr a while back.  I would love you to link up your corrugated cardboard art HERE.

Have a fabulous weekend!
Melisa

You can view all my Mixed Media projects HERE.
and background tutorials HERE.

Have a fabulous day!
Melisa

Saturday, August 11, 2012

Mixed Media : Altered Stamp Blocks


3 Houses
Last post I shared with you that I remove the rubber images from the wooden stamp blocks and remount them on cling so I can organize all my stamps in notebooks by catagory.  Well over the years I have saved up various sizes of the wooden blocks with the plan to re-purpose them into little works of art.  This is my fourth altered stamp block project.  There is a link at the bottom of the post, if you would like to check out the other 3.


I started with 6 rectangular stamp blocks.  3 for the bases and 3 for the roofs.  I had my husband cut 3 of the rectangular blocks into triangles to create my roofs.  Next I  spray painted the blocks.  I adhered the roofs on with Aleene's Tachy Glue.  The flower centers were made with clay and tissue paper.  I shaped a round disc with a dip in the middle from air-dry paper clay.  After dried, I wrapped it with tissue paper.


If you are interested in buying a set like this, email me.  (luv_2_stamp@yahoo.com) .


I couldn't find enough coordinating pattern paper in my stash, so I decided to create my own "text" patterned paper using a font that looks like it came from a typewriter.  Read more about how I created my "text" patterned paper below.  I used a free download from dafont.com called "Mom's Typewriter".


Creating your own text patterned paper
I had saved a list of quotes I found here and there that I thought would look good on ATC's or other Mixed Media projects and I just typed those up and then repeated them.  After printing my "text" patterned paper, I sprayed it with Krylon's Matte Finish "Workable Fixative".  Not sure I even needed it.  Heat setting with my heat tool may have been enough, but I was in a hurry and didn't want to risk the ink smearing.  I use Epson ink.    I used as little water as possible to add color.  I used Neocolor Watercolor Crayons for the pink and blue, and some Loew-Cornell watercolor paint for the yellow.  Doesn't matter what you use, those just happened to be the water color mediums that coordinated with the other ink / patterned paper colors I was using.  After the paper was dry, I cut pieces to fit my roofs.  I punched some circles from a sheet that was not colored, positioning the punch to focus on specific words.  Then I colored around the words and doodled.

You can view all of my Altered Projects HERE.
You can check out all of my Altered Stamp Block projects HERE.
You can check out all my Mixed Media style projects HERE.

Thanks so much for stopping by and I hope you are inspired to alter some stamp blocks of your own!
hugs, Melisa

This project was select as a trigger target over at Moxie Fab!!

Preview

*****************************************************

CHALLENGES

Moxie Fab - Hope this one is ok Cath.  I used a typewriter font to create my own patterned paper.


Link Parties :


Dear Creatives


SixSistersStuff.com
Come "Strut Your Stuff" with us


Feather Your Nest Friday


Show and Tell Friday @ My Romantic Home


Katie's Nesting Spot


It's Overflowing


I Heart Nap Time

Ladybird Ln

Saturday Spotlight @ Craft Envy


Lovely Crafty Home


What I Whipped up Wednesday @ Sugar and Dots


Make it Monday 


Making Monday Marvelous
HERE


HERE

A Marvelous Mess
HERE


 *********************************************************

Stamp Credits

House #1
Doily's - My Mind's Eyes
Butterflies on roof  - Hampton Arts
2 blue butterflies - Cornish Heritage Farms

House #2
Collage with butterfly - Hampton Arts
Key - Lost Coast Designs
Measuring Tape - Paper Artsy

House #3
Lock - Lost Coast Designs
Butterfly - Layers of Color

Tuesday, January 25, 2011

"March of the Snowmen" Blog Hop!

**** Winner for Blog Candy has already been drawn for my blog, but some of the others may have extended their deadlines for commenting, so check them out ***

Good Morning Papercrafters and welcome to another "March of the Snowmen" Blog Hop.  We had so much fun doing this last year that we decided to do it again.  We hope that you enjoy it as well.  We know the one thing that makes any blog hop sweeter ...  is BLOG CANDY!  And we have lots of it.  Over 1/2 the designers are offering up blog candy this year.  So read through each blog post carefully.

The official start time is 9am EST.
I love snomen and created 2 projects for the hop.

This is an altered sled photo frame I found at a local craft store.  It came as bare wood and I disassembled it by removing the brads and leather strap at the top.  I painted the wood and sprinkled with Diamond Dust.  I found the "Let it Snow" with a button pack at a local craft store.  The snowflakes are stamped in blue and embellished with jewels and manufactured white glitter snowflakes. The cute vintage image is by Crafty Secrets.


Recently I was hopping around and came across a project that had paperclay snowmen on it.  I made a mental note that I wanted to give it a try for this years blog hop, but now I can't find the link.  So whoever you were, thanks!  This launched me on a hunt for photo's of paperclay snowmen for inspiration, and in the process I came across a fabulous mixed media artist, Sue Pelletier.  She has a wonderful collection of paperclay snowmen that were published in Cloth, Paper Scissors!  Sue also teaches mixed media techniques.  I recently purchased one of her videos from Cloth, Paper Scissors and it was fabulous.  HERE.


Flicker is also a great resource for inspiration.  I have started my own little photo gallery of some of my favorites HERE.  One in particular that I fell in love with is this one.


Created by a wonderful artist Linda Silverthorne.  Her gallery is HERE.  And I was able to track down her Etsy store HERE.

And here are a few close-ups of my snowmen.
If you can roll a piece of clay into a ball, you can do this!
The hat was challenging though.


I covered mine with glitter.  I feel like this one needs a hat or something, but the project was already so tall ...

This hat was a challenge as well.  I had a hard time fitting the top of his head up into it.  But I was able to widdle out some of the inside until it fit on.


To learn some of the techniques about working with paperclay, I watched several video's over at YouTube HERE.  Now I did mine a little different because I didn't use the styrofoam, but I learned some things about working with the paperclay.  It takes here a total of 5 videos to finish the snowman ornament.

I'm the last one on the list, so if you haven't finished, then hop up to the top of the list to finish.
All links have been updated directly to the participants post.  So feel free to check them out anytime.
Melisa Waldorf - YOU ARE HERE

*************************************************

You can view all of my Altered Projects HERE

Thank you soooo much for stopping by.  Please join me friday.  I will be posting another cardboard art project for the Layers of Color Faith Art Friday.
Melisa
Related Posts Plugin for WordPress, Blogger...