Showing posts with label Style - Clean and Simple. Show all posts

Wednesday, September 11, 2013

Gina K. Designs "Fall Foliage"


Hello friends.  I know "fall is in the air" for some of you ... sadly not here in Texas.  We are still in the mid 90's every day so far for September.  I am so ready for fall.  So I've started putting up all my fall decor.  I've started a fall banner for the mantel.  I have all the flags done ... just need to add some leaves between the banners.  Hopefully will be able to share that soon.

In the meantime you can check out a fall banner I made last year with a cool tutorial on how to make some textured leaves HERE.

Some of the ladies from the Stamp TV Center Stage Alumni are having a blog hop and here is the inspiration photo :


So I'm sure you will be able to find more fall inspiration based on this photo.
You can check it out HERE.

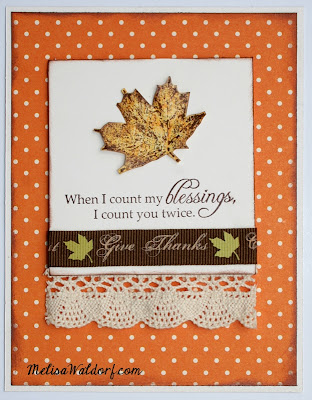
For today I want to share some cards I created using Gina K. Designs "Fall Foliage".  I will be adding some of these to my banner as well.  I wanted to play around and see what different looks I could get.  On the card above and on the last one, I stamped the image in brown ink over patterned paper.  I used my favorite brown ink Tsukineko - Brilliance "Pearlescent Chocolate".  


But for this one I used my a rainbow ink pad.  This particular one is by Tsukineko - Kaleidacolor "Cappuccino Delight".  Gorgeous fall colors.  Tsukineko makes rainbow pads in lots of fun colors and you can check them out HERE.


On the card above I simply stamp over patterned paper again.  You could whip up fall cards very quickly with these beautiful images!


Have a blessed day!
Melisa

You can check out all my Gina K. Designs projects HERE.
You can check out all my FALL projects HERE.


Monday, July 15, 2013

Gina K. Designs - "Retro Boutique" and WINNERS from last weeks give-away!


Good morning my crafty friends.  Quick post today to share a couple of cards designed using "Retro Boutique" by Gina K. Designs and the winners of last weeks give-away.  

Yesterday was a long day.  We finally made it to Wichita KS about 9 pm last night.  Today we are headed to Denver!  We will spend tomorrow moving our daughter into her apartment and then hopefully get to do some site seeing.  We have never been this far north before (We are GA, FL, TX people), so it will be fun to explore a different area of the country.

If any of you are familiar with Denver and have any recommendations for site seeing / eating out we would love to know!


I know we only had 12 commenters to draw from, but I still drew 2 names!  I used Random.org and the winners, after excluding blog hop participates are Maxine and Shelly!!  I know it says 1-100 on the photo's below, but I did use 1-12.  For some reason when I copied and pasted them, it changed to 100.

Ladies please email me your address's at luv_2_stamp.com and I will get your prizes to you as soon as we get back from vacation. 


True Random Number Generator  7Powered by RAN
True Random Number Generator  9Powered by RAN


Thank you so much for following my blog and taking the time to comment!
hugs, Melisa


You can check out all of my Gina K. Designs Projects HERE.

****************************************************************

Project Details

Card #1
Stamps : Gina K Designs
Patterned Paper : Authentique 6 x 6 paper pad
Copic Markers Y13, R32, W4, C8

Cover card front with patterned paper.  Trim white card stock 2 5/8" x 5 1/2", stamp image and sentiment.  Color image and adhere to card front.  Adhere lace.

Card #2
Stamp set : Gina K Designs
Patterned Paper : Authentique 6 x 6 paper pad
Copic Markers : Y13, R32, C8
Deckled Scissors : Fiskars
pop dots

Cover card front with patterned paper.  Trim white cardstock 2 1/2" x 5 1/2", adhere to black cardstock, and trim edges with deckled scissors.  Adhere   and trim.  Adhere to card front.


Wednesday, April 24, 2013

Gina K. Designs "Petals and Wings"


Hello friends.  I hope you are all well.  Hope the weather is warming up where ever you are.  It's been wonderful here except with the Spring comes the pollen and allergies. You can find all the info about my card at the bottom of the post.  

Today I want to take a minute to share a personal testimony with you as well.  It is the desire of my heart to always bring honor and glory to my Savior and my life has changed so much since December, that I feel He is leading me to share with you.  I don't consider myself a great writer or communicator so I am trusting that He will lead me in writing this.  

Some of you may be hurting, and desperate for change in your life.  And I want to share how God is healing me and has changed my life.  I'm not a bible scholar or saint, nor would I consider myself a mature christian or anyone knowledgeable enough to council others.  I certainly don't have all the answers, but thank goodness I know a God who does.  I'm just a regular gal who loves God and wants to share that with others.  Who gets up everyday and struggles with the same sin and problems you do.  I think too many times Christians are hesitate to share their problems / sin with others.  They want everyone to think they have it all figured out and sometimes we are afraid others will judge us.  So I'm putting my heart out there today to share something very personal with you, not because I seek your sympathy but because you need to know how awesome God is!

Life has really improved around our house.  My mom is slowly improving since her surgery and is doing well enough that we got her moved into her own little apartment.  I am so thankful for answered prayers and for all of you who have prayed for us the last 4 months.  We moved her here back in December thinking that we had her lined up for her to move into and apartment of her own shortly after arriving.  Living with us was never an option.  After getting her here they told us they would not accept her because of her bad credit ...  imagine our shock.  She was on the list for 2 other HUD apartments and they denied her as well.  So we were starting from scratch, and not sure when we would be able to find her something since she had already been rejected 3 times. 

What God taught me through this experience ...

Just to share a little background ... my mom was a single mom and an alcoholic.  My dad was not a part of my life.  There was a lot of hurt and neglect.  Children should feel loved and safe growing up.  And unfortunately things that happen to us as children can affect us as adults.  My  relationship with my mother has always been very strained.   We have tried to help her so many times in the past.  But frankly sometimes people don't want to change and you can not force them.  Her health began to really go down hill the last couple of years, and it became apparent I was going to have to step up and help.  This was not what I wanted to do.  It would not be easy.  And I wasn't sure HOW I was going to do it emotionally, but I felt like it was what God was calling me to do.  Sometimes when someone hurts you over and over again, you build a wall.  I didn't feel any love for her at all.  The relationship was so strained that seeing that she was calling me caused anxiety, and hugging her made me cringe.  I dreaded holidays if I was going to have to see her.  I'm just trying to share with you how bad it really was.  Sometimes as Christians we think we are trucking along, living like God wants us to, but maybe hiding away just one little something and refusing to deal with it.  We rationalize that it's ok to hide away this one little thing because there are so many other things we do that are good.   Well for me that was my relationship with my mother.  I always said I had forgiven her .... but really had I ?? if I loathed her that much???  I know now that God wanted me to deal with it and not in just the same town, but the same house.  I was so broken, and stressed, wondering how we were ever going to work all this out.  We had tried helping her and letting her live with us in the past and it did not go well.  She has some mental issues as well.  And I was stuck in between my mother and husband wondering every day if someone was going to explode.   I had no where else to go but to God.  I began praying for Him to speak to my heart ... to change my heart and help me to see my mother differently, to help me forgive and love her as a Christian should. 

 First He reminded me that everything I have is His.  My house is His and if He wants to use it to help someone less fortunate I had to accept that.  I began praying fervently not just in general for God to take care of this problem, not just that He would open up another option for somewhere else for her to live, because that's the natural response we have to something like this ....  but that He would teach ME whatever it was I needed to learn from this situation and help to change my heart. My desire to live and love like He wants me to has to be bigger than my selfish desire to continue to continue like I had been.  I knew there was now way my mother was going to change and become this lovable little angel.   But I believed and knew that God could help me to change.  Sometimes we want to pray for God to change the other person we think is the problem ... but we don't want God to tell us what we need to change about ourselves.  We think that if they would just change ... then we could love them.  But that's not the kind of love God has for us .... it's not conditional, thank goodness!  Because there is nothing we can do to earn it.   Not everyone is easy to love.  The easy thing to do is to avoid/ignore the problem, tuck it away like it doesn't exist ... but like in my life it may catch up with you and you may have to deal with it.  God decided it was time for me to deal with my un-forgiveness.  I began reading a book by Beth Moore "Praying God's Word".  WOW!  God has used this book to speak to me like never before.  I'm breaking though my stronghold of un-forgiveness, among other things.  I know it may always be a struggle, but the joy and peace I have now is amazing.  Seriously .... God is MY Xanax!  The feeling of relief when we finally let things go and give it to Him is amazing. Sometimes I have to get up, pray and give it to Him several times a day.  It has changed me in such a way that others have noticed as well.  My daughter and husband have been so surprised at how I have stepped up and dealt with things, and I give God all the honor and glory.  There is no way I could have broke through all the anger / resentment / un-forgiveness / anxiety regarding this with out Him.  He is changing my heart.  And I'm excited about what else He is going to teach me!

Please just know that if you are hurting that God loves you, wants to have a relationship with you.  Not the kind where you show up for church every week and think you are doing all the right things, volunteering and serving. But one where you are depending on Him, talking to Him about everything, reading His word, seeking His council ....a real relationship.   A personal relationship just between you and Him.  You will begin to hear His voice and it will change your life.  I hope that you will open up to God and let Him help you with challenges in your life as well. Not sure where to get started?  Email me at luv_2_stamp@yahoo.com

I hope you have a fabulous week!!
Melisa

You can check out all of my Gina K. Designs Projects HERE.

*******************************************************

Project Details

Stamps : Gina K. Designs “ Petals and Wings”
Patterned Paper : My Mind’s Eye
Kraft Cardstock : Papertrey Ink

Trim patterned paper and kraft panels, and ink edges.  Stamp
kraft panel with polka dots, and orange panle with florals / butterflies.
Add French knots to center of flowers.  Stamp sentiment on
kraft paper, trim and ink edges.  Adhere to card front then embellish
with 2 cross stitches.  Adhere both panels to card front.  Embellish
with buttons.


Wednesday, October 24, 2012

Sweet n' Sassy - "Autumn Bounty"


Good Morning!  Today I'm sharing a CAS card.  I used "Autumn Beauty" by Sweet n' Sassy Stamps.

Tomorrow I'm sharing a background tutorial, so I hope you will join me.

Have a great day!
Melisa

You can check out all my Fall / Thanksgiving projects HERE.

***************************************************

Project Details

Stamps : Sweet 'n Sassy "Autumn Bounty"
Copic Markers : YR20, YR15, E57 (pumpkins)  YR15, E97, E57 (flower) Y00, Y15, E43 (sunflowers)  YG61, G24, G99 (leaves)  E40, E41 (vase)  E23, E57 (ribbon)

Stamp floral image on card front and on Eclipse Masking Tape.  Trim image along left side of image on masking tape and cover image on card front.  Stamp pumpkin image then remove maskig tape.  Color with markers.  Stamp sentiment.  Embellish with ribbon.

****************************************************

Challenges

Kaboodle (mon) - anything fall
Love to Create (mon) - pumpkins
Hand Stamped Sentiments (tues) - photo inspiration


Craft Us Crazy (thur)- fall into the season


Tuesday, October 23, 2012

The Stamps of Life - "Tree's 2 Build"


Good afternoon stampers!  Hope your day is going well.  I wanted to share another project today.  I love this set by The Stamps of Life "Tree's 2 Build" and it was easy to whip up a quick card for a couple more challenges today.  Hope you get a chance to be creative today as well!!

hugs,
Melisa


*******************************************************

Project Details

Stamps : The Stamps of Life “Tree’s 2 Build”
Ink : Stampin’ Up “Regal Rose“, Versa Magic “Tea Leaves”
Patterned Paper : My Mind’s Eye Miss Caroline 6 x 6 paper pad
Border Punch : Fiskars
Ribbon : Offray

Stamp tree truck in black ink on card front.  Stamp leaves in green ink, doodle around edges of each leaf, trim and adhere around tree.  Paper piece small birds.  Create bodies from patterned larger wings stamped in rose ink.  Create small wings from patterned leaves stamped in green ink.  Cut patterned paper strip and tear along 1 edge.  Add punched border along bottom edge.  Adhere to card front and embellish with ribbon.  Stamp sentiment.

**********************************************************

Challenges
Stampalot (monthly) - punches (border punch)
Order of the Opus Gluei (sun) - use leaves on your project
The Crafty Pad (sun) - Use an animal
CASology (tues) - wild (the birds are wild)
Crafty Creations (wed) - Get Well

Thursday, October 18, 2012

Creating Clean and Simple cards using Eclipse Masking Tape


Hello card makers!  Today I'm sharing some clean and simple cards designed using "Just Bee-Cuz" and "Background Soup" by Red Rubber Designs.  I used my Eclipse masking tape (the rolls at this link are shorter than mine).  It may seem like a lot of work because you have to stamp the main image once on the card front and then again on the masking tape, then cut out your masking image.  But you can use the masking image multiple times.  After the ink for the main image is dry, cover it with the mask image.  Then stamp you background images.   I used torn pieces of masking tape to mask off area's that I didn't want the background image.  I hope that makes sense.  I'm realizing now that it would have been much easier to take step by step photo's.

Thanks for stopping by!
Melisa

****************************************

Challenges

Sentimental Sunday's - Black and white plus one other color
Charisma Cards - clean and simple
Simply Less is More - 1 layer / wings (card #1)
Paper Crafting Journey - add some bling
Do You Stack Up - vintage

****************************************


Project Details 

Stamps Red Rubber Designs 
Ink : Tsukineko VersaMagic Purple Hydrangea
Eclipse Masking Tape
Decorative tape : Heidi Swapp


Thursday, October 4, 2012

Gina K. Designs - "Springtime Silhouettes"


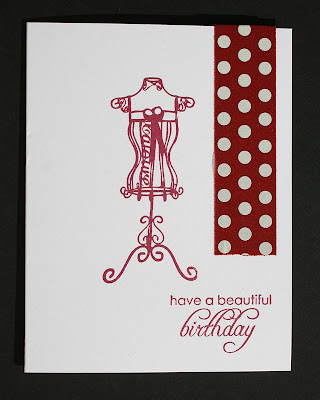
Today I'm sharing a set of clean and simple cards using GinaK Designs "Springtime Silhouettes".


Combined with some fabric tape these were very easy to put together.


And would a quick and easy set like this make a great gift set??
Thanks for stopping by!
Melisa

You can check out all of my Gina K. Designs Projects HERE.

********************************************

Project Details


Stamps : Gina K “Springtime Silhouettes”
Fabric tape : 7 Gypsies
Ink : Colorbox Fluid Chalk Maroon

Stamp image and sentiment. Embellish with fabric tape.


Thursday, August 23, 2012

Gina K. Designs - "Stars" with gesso


For this ensemble, I decided to focus on CAS and gesso.  The stamp set is "Stars" by GinaK Designs.  Isn't that star border die so cute!!  It's by Sweet n' Sassy.  It comes as a combo with a heart one as well.  


The large star is from a stencil.


thanks for stopping by!
Melisa

You can check out all of my Gina K. Designs Projects HERE.

*********************************************

Project Details

Card #1
Rock Star - 4 1/4" x 5 1/2"
All Stamps : Gina K. Designs "Stars"
Kraft Paper : Papertrey Ink
Patterned Paper : Cosmo Cricket 6 x 6 paper pad
Ink : Tsukineko Brilliance Red Rocket
Gesso
Star Stencil : Art Minds by Michaels

Dry brush on gesso where you want to stamp sentiment.  Trace large star on patterned paper with a stencil, trim, and adhere to card front.   Stamp stars, trim, and adhere to card front.  Stamp sentiment.

Card #1

Card #2

God's Promises - 4 1/4" x 5 1/2"
All Stamps : Gina K. Designs "Stars"
Kraft Paper : Papertrey Ink
Ink : Tsukineko Brilliance Red Rocket
Gesso
Star / Scallop die : Sweet n' Sassy

Dry brush on gesso where you want to stamp sentiment.  Cut star / scallop borderwith die and adhere to card front.  Stamp stars, trim, and adhere to card front.  Stamp sentiment.


Card #3
Good Friends - 4 1/4" x 5 1/2"
All Stamps : Gina K. Designs "Stars"
Kraft Paper : Papertrey Ink
Ink : Tsukineko Brilliance Red Rocket
Gesso
Star die : Sweet n' Sassy

Dry brush on gesso where you want to stamp sentiment.  Cut star / scallop border with die and adhere to card front.  Stamp stars, trim, and adhere to card front.  Stamp sentiment.


Wednesday, August 8, 2012

4 Ways to use masking with your stamps


Hello Stampers.  I haven't blogged in several month's and I'm trying to get back into the swing of it.  Today I'm sharing some cards I whipped up using some of my newest stamps.  I love the vintage / collage look of these images.  They are from Red Rubber Designs.  Red Rubber Designs is owned by a very sweet lady I met when I was a The Angel Company Demonstrator.  After I heard that The Angel Company had closed it's doors I was so excited to here that Pam had decided to continue sharing some of there wonderful images but in the retail market now.  You can read more about Pam HERE.  The stamps are sold as rubber sheets, so don't forget to purchase a sheet of cling mount with your order.

You can read more about mounting your rubber stamps using cling mount a hot knife / scissors at the bottom of the post.

I used 2 sets, "Just Bee-Cuz" and "Background Soup".  My favorite section is the "Vintage" sets.  LOVE the collage look and these images make it so easy to whip up a quick collage looking card.  The first card was designed using "masking".  You can read more about "masking" at the bottom of the post.

I used several very basic stamp techniques on the following.


On this one I stamped the image repeatedly to create a background.


On this one I stamped the image twice.  Once on the patterned paper (because I didn't want to try and trim all the little fuzzy details or antennas.  I stamped the image again on cream cardstock, trimmed and then adhered over the image stamped on the patterned paper.


On this one I stamped directly on the patterned paper.

You can view all my Red Rubber Designs projects HERE.

More about masking :
1.  The polka dot stamp image was a little longer than I needed, so I used a post-it note to mask off the left side of the card on this one and the lower part of the card on the 2nd one.  You can just use a regular piece of paper if you don't have a post-it.  The post-it works great because it has just enough adhesive to hold it in place.

2.  On card #1, I cut a window (2.5" x 3") out of a piece of light weight cardstock.   Regular paper works fine, but the light weight cardstock will hold up better and now I can use it repeatedly.  I placed the window over the front of the card.

3.  I stamped the baby carriage once in the center of the window and again on Eclipse Masking tape.  I cut the image from the masking paper and covered the image on the front of the card.

With the window mask still in place, I started stamping from right to left, the alphabet image, and then the polka dots x2.

4.  Masking Fluid -  Brush it over the area you want to mask.  After you are finished with your technique, peel the mask off by gently rubbing with your finger.


More about mounting your stamps :
I love to purchase my stamps as plain red rubber if they are not available already mounted on cling.  That's because store all my stamps in notebooks by either manufacturer or catagory.  So, if my stamps are own blocks, I have to remove the rubber, put them on cling mount and then cut them out with my hot knife / or rubber cutting scissors.  So I love buying just the red rubber, it saves me a step.  The hardest part of converting from wood to cling is sometimes getting them off the block.  If they are resistant, I put them in the microwave for 20-30 seconds to soften the adhesive.  Most of them come off pretty easily after that, but then I sometimes have to rub my thumb back and forth over the back of them to remove some of the adhesive.  You can view a video on how to mount your rubber stamps using "Easy Mount and a Hot Knife"  HERE.  I purchased my hot knife years ago in the woodburning section at Joann's Crafts.  If you have a pair of the Tonic Scissors, then just lay the "full" sheet of rubber over a sheet of cling mount.  Then just cut through the rubber and cling all at once and your scissors stay pretty clean.  If the stamps do not have any rubber space around them or are already trimmed close to the image, then you place it on the cling mount and use a hot knife.  You do not want to use your scissors to trim in this instance because the adhesive is going to stick to the scissors as you cut through the cling mount.  In the video she demonstrates how to use the hot knife with a glass mat.  I have never done it this way.  The knife is really hot and cuts through the cling mount like butter.  I just hold the stamp / cling mount up in the air / off the table and glide the hot knife blade around the edge of the rubber.  I have never had any burning accidents doing it that way, but of course you should do whatever is safest for you.  This is the way I do it most of the time instead of the scissors.  Why?? I'm cheap and I don't want to waste any of the cling mount.  So I cut the images out first, as close to the image as I can, and the place it on the cling mount.  Then trim with the hot knife.

************************************************

Challenges


Woowhoooo!!!  I won $30 free Denami stamps for playing along with the SSIC challenge!!


Card #1
CPS - Sketch
SSIC - baby or pastels
The Crazy Challenge - Black and White plus one other color
The Ribbon Carousel - stitching
Crafty Catz - pink

Card #2
Creative Inspirations - anything goes
Simon Says - BINGO (ribbon, free, blooms(patterned paper)
Fussy and Fancy  - Vintage distressing (torn paper) and lace

Card #3
 CAS-ual Fridays - things you would see in the sky (bee)
Sweet Stampin' - book or book text

Card #4
Tuesday Throwdown - on the move
No Matter Which - anything goes

************************************************


Project Details

You're the best
Stamps : Red Rubber Designs "Just Bee-Cuz" and "Background Soup"
Patterned Paper : Colorbok (yellow), Jennie Bowlin (book paper)
Ink : Tsukineko VersaFine Onyx Black

Mask off left side of card and stamp polka dot strip twice.  Adhere torn book paper.  Adhere patterned paper strip.  Stamp sentiment and car.  Embellish with lace scrap.

Just Bee-cuz #1

Stamps : Red Rubber Designs "Just Bee-Cuz"
Patterned Paper and tag : Colorbok "Antique Paperie"
Ink : Tsukineko VersaFine Onyz Black

Stamp bee repeatedly on top 1/2 of cream card.  Cover lower 1/2 with patterned paper.  Adhere lace across seam.  Adhere paper tag, stamp sentiment and bee on tag.  Stamp bee again on cream cardstock, trim and adhere over bee on tag.  Embellish with ribbon / bow.

Just Bee-cuz #2
Stamps : Red Rubber Designs "Just Bee-Cuz" and "Background Soup"
Patterned Paper : Colorbok (yellow), Jennie Bowlin (book paper)
Ink : Tsukineko VersaFine Onyz Black

Mask off lower part of card and stamp polka dot strip twice.  Adhere torn book paper.  Adhere patterned paper strip.  Stamp bee and sentiment.  Stamp bee on cream cardstock, trim and adhere over bee on patterned paper.  Embellish with lace scrap.


Tuesday, April 10, 2012

Sweet 'n Sassy's "Owl Be There"


Good Morning Paper Crafters. Today I'm sharing the other 2 cards I created using "Owl Be There" by Sweet 'n Sassy.   Such a cute little friendship set.  I was inspired to create these when I saw a Color Throwdown challenge posted last week, to use the colors from the Mabel paper pad by My Mind's Eye.  If you are like me you have a pile of those little 6 x 6 paper pads laying around. The small paper pads are perfect for paper piecing stamped images because the patterns are so small. So think of all the options for creating your own little set of cards using this set and your paper pads.  


Soooooo many possibilites with this image!  Wouldn't the image be cute with a little bow on the head for a girl, oh and what about a party hat??? That would make a great birthday card! You could have him sitting on top of a birthday gift. I'm trying to think of other things we could tuck under his wing .... what about a book and a graduates hat on his head .... or a balloon.

Another great idea would be to put two of them standing side by side with their wings touching so they look like they are holding hands. There just may be enough room between the wings to have him holding a banner. We can have a lot of fun with this little guy!

I'd love to know what idea's you have. If you would like to share an idea or a card you created using this little guy just leave me a comment with a link to your card.

Hope you're day is a hoot!
hugs, Melisa

You can view all of my Sweet n' Sassy projects HERE.

*************************************************

Project Details
Stamps : Sweet N' Sassy "Owl Be There"
Patterned Paper : My Mind's Eye 6x6 paper pad "Mabel"
Cardboard Flowers : Jillibean Soup
Buttons : Papertrey Ink
Embossing Folder : Cuttlebug
Border Punch : Fiskars
Spellbinders Classic Oval dies
Mini Stapler : Ranger
Card #1
Create a top from cream cardstock.  Emboss card front with embossing folder.  Trim patterned paper 1" x 4 1/4".  Punch scalloped border.  Adhere together and wrap with twine, threading through buttons as you wrap.  Adhere panel to card front.  Stamp owl and paper piece.  Paint tooth pick.  Stamp sentiment on patterned paper and trim creating a flag.  Wrap end of flag around tooth pick and staple with mini stapler.  Adhere owl and flag to card front.  Doodle around edges.
Card #2
Trim cream cardstock 4 1/4" x 5 1/2", emboss, and adhere to card front.  Trim floral patterned paper panel 2 1/4" x 4 1/2".  Punch scalloped border.  Stamp owl, and paper piece.  Adhere buttons to center of cardboard flowers.  Cut oval with Spellbinders oval die.  Stamp sentiment.  Adhere all pieces to card front.  Doodle around edges.

*************************************************
Challenges
Paper Sundaes (sun) - kraft / diecut (flowers and circle)
4 Crafty Chicks (thur) - flowers
CCEE (thur) - embossing folder
Charisma Cardz (thur) - chipboard
Stamp, Scrap, and Doodle (sat) - things with wings
ABC - anything goes
Stampendous - re-use, re-purpose (tooth pick)
Cupcake Craft (mon) - spring is in the air
Splitcoast Stampers (mon) - scallops

*********************************************

Card #2 was featured at :

Sunday, April 8, 2012

Sweet n' Sassy "Owl Be There"


This is another one of the new releases from Sweet 'n Sassy this month, "Owl Be There"!  Another cutie patootie!   It's so much fun to paper piece this little guy.  This is a card from a 3 card set I am sending to Take Ten for their Variation on a Theme.  I will be sharing the other 2 on tuesday.  See ya then!

You can view all of my Sweet n' Sassy projects HERE.

******************************************************

Project Details
Stamps : Sweet N' Sassy "Owl Be There"
Patterned Paper : My Mind's Eye 6x6 paper pad "Mabel"
Buttons : Papertrey Ink
Embossing Folder : Cuttlebug
Border Punch : Fiskars
Create a top-fold card from cream cardstock. Emboss card front with embossing folder. Trim patterned paper 2 1/4" x 4 1/4". Punch scalloped border from patterned paper and adhere along top of othere panel. Wrap with twine and tie bow. Adhere to card front. Stamp owl and paper piece. Stamp sentiment on cream cardstock, trim creating a flag, and adhere button. Adhere owl and flag to card front. Doodle around edges.

***************************************************

Challenges

My Mum's Craft Shop (wed) - animals
Papercraft Star (wed) - anything goes
Fab N Funky (wed) - embossing
Crafty Catz (fri) - clean and simple
Color Throwdown (wed) - color challenge

Wednesday, April 4, 2012

GinaK Designs - "Springtime Silhouettes"


GinaK's Springtime Silhouettes has 9 different silhouette images in it.  So easy to stamp and no coloring necessary.   It also comes with 11 different sentiments that cover a wide range of themes.  So this one set, goes a long way.  Sentiments for friendship, birthday, encouragement, I'm sorry, and get well are just a few.  I have 2 more cards using this set in the works and can't wait to share more idea's for this one!

I kept this one clean and simple.  White space is hard for me, but I like how this one turned out.    I used up some really old ribbon and cardboard buttons from my stash.  That's always a good thing.  I used Spellbinders Labels Four.
I would like to invite you to join me tomorrow for the Sweet N Sassy blog hop.  Lots of chances to win free stamps!


Thanks for stopping by!
Melisa

You can view all of my GinaK Designs projects HERE.


Monday, March 26, 2012

The Craft's Meow - Happiness is ...


Good Morning!  Today I'm sharing a card using another one of Nina Bracket's sets.  I just love those bee's!  You can get this set at The Craft's Meow. 

I hope you have a great week!!  Melisa

You can view more projects using The Craft's Meow HERE.
You can view more projects using bee images HERE.

***********************************************

Project Details
Stamps : The Crafts Meow "Happiness is"
Copic Markers : Y0000, Y11, E23, YG61, G82, YG67
Border Punch : Martha Stewart

Mask off bottom 1.5" of white card.  Stamp rose on card front and on Eclipse Masking TApe.  Trim rose from masking tape and cover rose pm card front.  Stamp leasves around rose image.  Remove mask from rose and long bottom border.   Stamp bee's and sentiment.  Color images.  Trim yellow cardstock 1" x 5.5" and create decorative border using border punch.  Adhere to card front.  Wrap ribbon and tie knot.


*******************************************

Challenges

Papertake Weekly - Bingo!  Ribbon, free space, punch
Tuesday Throwdown : use something from your stash - my gingham ribbon is really old.
Creative Belli - Clean and Simple
Cute Card Thuresday - anything goes
Lily Pad - flowers
SCS - 3 or more
Stampin wih the Dragon - things with wings

Grab Our Button

Grab our badge and link back to us!
Related Posts Plugin for WordPress, Blogger...