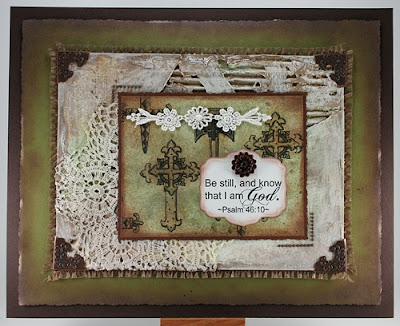
Hello Papercrafters. Recently I had the pleasure of creating a project for Faith Art Friday over at the
Layers of Color blog. The verse I selected to focus on is "
Be still, and know that I am God" Psalm 46:10.
I wrote this over a week or so ago, and had no idea how quickly my life would change and how I would need to be reminded of this as well. We have had some family issues that have been very upsetting this week. So after a momentary emotional break down, I drew near to God, knowing that it was the only way I could have peace regarding this problem. Believing that my God loves me and will be with me no matter how difficult life becomes. I hope that this is a verse that you can fall back on as well when times of trouble come in your life. If you are in the mist of troubled times as we speak, please email me, I would love to pray for you.
While this verse was written in reference to a time of war as the Kingdom of David was being established, it is applicable to our everyday lives as well. To “be still” means to cause yourself to let go or become weak. So that He can work. In the face of life problems, how many of us try to “fix it” ourselves, without taking the time to go to God in prayer first. I know that I have. Many of us want to be in control of our lives and work hard at manipulating things to obtain the outcomes we desire. But by doing so, we prevent God from working in our lives, and receiving the honor and glory He desires.
Have you ever wondered how you would respond in the face of tragedy as a Christian? I have. In my life I have not had to deal with the fear, loss, pain and suffering that many have … and I wonder if my response would be one that would bring honor and glory to my God. Events of this past month around the world have broken my heart to hear about, and made me pause and wonder how I would have responded in these circumstances.
Sometimes we need to get out of Gods’ way. Let Him work. How do we do this? By knowing who He is. How do we reach a point in our spiritual growth that we can “be still” in the face of tragedy? By knowing who He is. How do we deal with the grief of loosing a child or loved one? By knowing who He is. How do we obtain peace in a time where others are falling apart? By knowing who He is.
How do we know who He is?? By knowing His history, His word, His promises. This knowledge gives us everything we need to face what life will bring us and an assurance that our God is in control, and if we get out of His way, He will do the work. Then what will be left for us to do?? … the easy part … singing His praises!
**************************************************************
Project Details
This one is another piece of corrugated cardboard art. I really LOVE working with this stuff. The idea for this one was to create a project large enough to have framed and hang on a wall. This project is 9 1/2" x 12" and doesn't look so dark in real life.
My bedroom is in green and brown so this will be perfect to frame and hang in there. Thankfully DH gave me the thumbs up! He doesn't usually ooh and ahhh over my projects, but he did on this one.
I began with my corrugated cardboard, tearing away pieces of the top layer to expose the ripples underneath. I layed the right lower corner and left upper corner torn patterned paper and center panel over it to help me decide where to tear and balance it. I never know which direction I will go and just continue to add and layer things until I get a look I like. Don't be afraid to just start slapping it on. It's just a peice of cardboard, and it is so easy to start all over again if you don't like it. Usually there is some type of patterned paper barely peeking through, because my original intention is to have it on the project, but by the time I'm done, it has been mostly covered. Take a look at the left upper corner and you can see some music notes peeking through.

After tearing away some of the top layer, I add acrylic pain
t. Usually 2-3 colors. I already had the brown to accentuate the inside of the ripples, so I mostly added white and a tan colors along the top, as well as some green Glimmer Mist here and there. Next I added white crackle paste with a palette knife. Not as much as usual, but you can see it allong the edges. Remember the thicker the crackle paste, the larger the cracks. I found a new crackle paste because those little bottles by Ranger can get pricey, and I wanted something more readily available since I love using it. Mine is by DecoArt and can be found at Micheals. It comes is a 10oz container versus the little 1oz by Ranger.
I wanted to add more texture and I had picked up some doilies at a local antique store recently. I LOVE lace, so what better way to enjoy it than to include it on a wall project! The rest is pretty easy to create looking at the photo's.
I hope this little tutorial inspires you to create some of your own backgrounds. If you do, shoot me an email. I would love to check it out.
I hope you have a crafty day!
Melisa
See to other Masking Tutorials I have done HERE.
You can view more of my Cardboard Art HERE.
You can view my other Faith Art projects HERE.
You can view more of my Collage / Mixed Media projects HERE.
*************************************************
Masking Tutorial
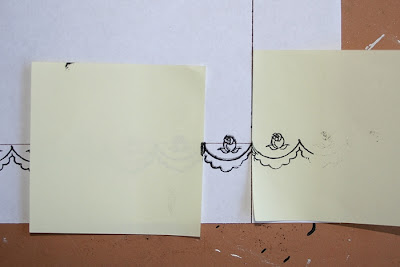
If you are new to stamping, you may not know what masking is. It is simple the covering up of an area the you want to stamp over, but only want the image to appear around the masked image. So in this case I stamped the center portion of the cross first onto my project. Then stamping it again onto another piece of paper. Cut the second one out creating a mask to cover up the image on your project. I use Eclipse Masking tape because it is lightly sticky (like a post it note) on the back. Sometimes Post-it notes will work. But only a small portion is sticky. Post-it notes are pretty expensive, to I looked at the Eclipse tape as an investment long term. It has lasted me a long time and I love that it stays put while I"m stamping over it with the second image.
Lay your mask over the same image on your project. Now stamp the background image over it.
And that's how you get that great layered look!
This is just one technique for masking. It is used with brayering as well. And I'm sure other ways I am not even aware of. I have tried masking fluid and didn't like it.
************************************************


