Showing posts with label Technique - Paper Piecing. Show all posts

Monday, July 15, 2013

Gina K. Designs - "Retro Boutique" and WINNERS from last weeks give-away!


Good morning my crafty friends.  Quick post today to share a couple of cards designed using "Retro Boutique" by Gina K. Designs and the winners of last weeks give-away.  

Yesterday was a long day.  We finally made it to Wichita KS about 9 pm last night.  Today we are headed to Denver!  We will spend tomorrow moving our daughter into her apartment and then hopefully get to do some site seeing.  We have never been this far north before (We are GA, FL, TX people), so it will be fun to explore a different area of the country.

If any of you are familiar with Denver and have any recommendations for site seeing / eating out we would love to know!


I know we only had 12 commenters to draw from, but I still drew 2 names!  I used Random.org and the winners, after excluding blog hop participates are Maxine and Shelly!!  I know it says 1-100 on the photo's below, but I did use 1-12.  For some reason when I copied and pasted them, it changed to 100.

Ladies please email me your address's at luv_2_stamp.com and I will get your prizes to you as soon as we get back from vacation. 


True Random Number Generator  7Powered by RAN
True Random Number Generator  9Powered by RAN


Thank you so much for following my blog and taking the time to comment!
hugs, Melisa


You can check out all of my Gina K. Designs Projects HERE.

****************************************************************

Project Details

Card #1
Stamps : Gina K Designs
Patterned Paper : Authentique 6 x 6 paper pad
Copic Markers Y13, R32, W4, C8

Cover card front with patterned paper.  Trim white card stock 2 5/8" x 5 1/2", stamp image and sentiment.  Color image and adhere to card front.  Adhere lace.

Card #2
Stamp set : Gina K Designs
Patterned Paper : Authentique 6 x 6 paper pad
Copic Markers : Y13, R32, C8
Deckled Scissors : Fiskars
pop dots

Cover card front with patterned paper.  Trim white cardstock 2 1/2" x 5 1/2", adhere to black cardstock, and trim edges with deckled scissors.  Adhere   and trim.  Adhere to card front.


Tuesday, June 18, 2013

Home Sweet Home ...


Hello friends.  I'm feeling a little sad.  My daughter found a teaching job in Colorado and will be moving mid July and getting her first apartment, her own little home sweet home.  I am going to miss her so much.  But that's the way it works .... they grow up and move away.  I have been praying for God's will to be done in her life, which is hard because I couldn't help but selfishly hope that His answer would be that she couldn't find a job there and might have to stay in TX with us.   She will be teaching a 5th grade class and she is so excited, making plans for the move and for her class room.  These kids will be so blessed to have her as a teacher.  It will be a long trip to move her.  But it will be fun to go with her and help her get settled in her new apartment.

On a happier note ....
Today  I'm sharing another DT for The Cutting Cafe.  The theme this week is houses.  We got to choose between using "House Shaped Card" cutting file or the "Welcome Home" printable stamp set.  I went with paper piecing again.   I was dying to use my new 6 x 6 paper pad by My Mind's Eye (In Bloom) that I had picked up at Michaels.

There will be lots of inspiration using these files over on the TCC Blog tomorrow.  She usually gets the post up by late afternoon.  You can check it out HERE.

Paper Piecing Info
I used the PDF printable stamp set files for this project.  Several images come on 1 PDF page, but I only needed to use a single image on a page.  I followed Regina's instructions found HERE, on how to select and print just one image on a PDF page.

1. Print the image as a draft. The image will be positioned in the center of the page.
2. Trim a piece of patterned paper a size that will cover the image ... making it longer than needed.
3.  Lay the patterned paper over the draft image with the excess over the top of the image.
4.  Run light tack tape along the top of the patterned paper to secure it in place and keep any corners or edges from jamming up your printer.
5. Print and then remove the patterned paper.  Use the same draft and do it again with a new piece of patterned paper.

I ended up printing mine out on 3 pieces of pattern paper, white (to use as a base ... something to glue the pieces to), and cream (used inside windows).

To decided how to cut .... look at the image in sections.  This one has more detail than I usually deal with.  Begin by piecing the windows and doors.  

Door / Stairs : Trim the yellow door leaving excess along the bottom to glue the stairs to.  Set it aside. Windows : Trim the pink for the window on the roof first, leaving extra paper around the edges to glue the trim to.  Cut the actual window from yellow patterned paper then trim out the panes and adhere it to cream cardstock.  Adhere this to the first piece.  Do the same for the other windows.

House base : Trim pink side of the house and chimney out.  Trim the grey roof flush to all sides.  Trim the scalloped eave with extra paper left along the top so you can adhere it under the edge of the roof.

Now just adhere the roof over the pink house, then add the windows and door.  Don't forget about the trim for the chimney.

Hope you are having a fabulous week!!
Melisa


Wednesday, April 24, 2013

Gina K. Designs "Close-knit Friends" and "Retro Boutique"


Hello friends!  I'm doing 2 post for today.  I'm trying to get back into crafting and blogging on a regular basis now that my mom is doing better.  Right now I'm working on some magazine calls and then I will switch back to blogging more.  So many idea's, so little hours in the day!  The first post was so personal, that I wanted to split them up because I have more cards to share with you.  I love this set!!!  Isn't the sentiment so clever???   I paper pieced the image for this one.  I liked the color combination of the kraft, black and orange so much that I decided to see what else I could create using them. 

Do any of you have a cutting machine??  Which one do you think is better????


I paper pieced the dress on this one.  I used my black oil pastel around the circles to make them pop.

What do you think about this color combo??  I hope you are inspired to give it a try and as always ... if you are, let me know so I can check out your project!

Hope your day is filled with sunshine and joy!
hugs,
Melisa

You can check out all of my Gina K. Designs Projects HERE.

********************************************************

Project Details

Card #1
Stamps : Gina K. Designs  “Close-Knit Friends”
Patterned Paper : My Mind’s Eye
Cream and Kraft Cardstock : Papertrey Ink
Markers : Copic YR68, YR07, E31, E55
Ink : Momento “Tangelo”

Stitch cream panel to kraft panel and adhere to card front.  Trim
strip of patterned paper with deckled scissors, scrunch and
zig-zag stitch.  Adhere to card front.  Stamp yarn / basking on
cream and kraft cardstock.  Color, trim and paper piece yarn / basket.  Adhere to card front.  Stamp sentiment.  Embellish with buttons.


Card #2
Stamps : Gina K. Designs “”Retro Boutique”
Patterned paper : My Mind’s Eye
Cream and Kraft Cardstock : Papertrey Ink
Circle Punches : EK Success and Paper Shapers
Oil Pastels : Crayola

Trim kraft panel, stitch around edges, and ink edges.  Punch circles
from patterned paper, ink and doodle around edges, and lay out on
kraft cardstock panel.  Lightly trace around edges of circles with pencil
and then set circles to the side.  Apply black oil pastel around penciled
outlines and rub / blend with fingers.  Adhere patterned paper circles
to card front.  Adhere kraft panel to cream card front.  Stamp dress on
kraft cardstock and patterned paper.  Color belt / trim black, trim, and
then paper piece dress.  Adhere to card front.  Stamp sentiment.

Tuesday, October 23, 2012

Pink Persimmon Style Girl Layout


Hello paper crafters!  Today I am sharing a 12 x 12 layout I designed using Pink Persimmon's new release stamp set "Style Girl"!  I really have been trying to use up my old scrapbook supplies, but I made a trip to my local scrapbook store recently (Archiver's), and couldn't resist some of the new My Mind's Eye.  The Sweetest Thing line is truely sweet!!


I used some old photo's of an aunt (my mom's sister) for this layout. 


Growing up I thought she was so cool!   She didn't have kids of her own, so my brothers and I were very special to her.  She was always laughing and joking with us.  A sweet and loving women who died way to young.  I think if she had lived to her sixties she would have still had a youthful and joyous approach to life.  It's just who she was.


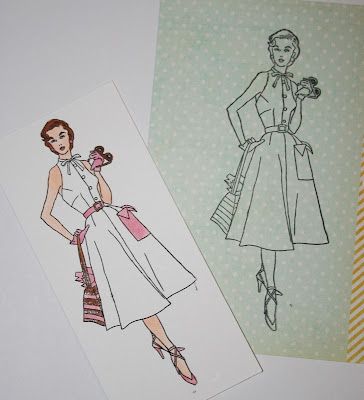
I paper pieced my Style Girl images.  Stamp the image on patterned paper and on white cardstock.  Color as shown with markers.  


Trim as shown.  Hard to see in the photo, but along the left side I trimmed around the hand bag by cutting into the dress to leave a little white cardstock to tuck behind the patterned paper skirt.  You can get away with not cutting around the handbag like that, but I had to trim the white out above it and around the hand on the hip, so it was just easier to cut out if I cut the handbag a well.  Layer the skirt and then adhere the white side of the hand bag to the back, and the thumb on top of the patterned paper skirt.  Adhere the pocket.  Adhere the top of the dress.  Color collar / bow and buttons.  The second girl was paper pieced the same way.  

I hope you will stop back by on Thursday for a background tutorial

Thanks so much for stopping by and have a blessed day!!
Melisa

Check out Pink Persimmon stamps HERE.

You can check out all my Scrapbook Layouts HERE
You can view my Mini-Albums HERE.
You can check out all my Pink Persimmon projects HERE.


****************************************

Project Details

Stamps : "Style Girl" Pink Persimmon
Check out Pink Persimmon stamps HERE.
Patterned Paper and Cardstock Embellishments : My Mind's Eye "The Sweetest Thing" by Jen Allyson
I used a sheet from the 6 x 6 paper pad for the doily and dresses
Die : "French Pastry Doily" by Cheery Lynn Designs
Tag : Donna Downey
buttons and lace : unknown
Markers : Copics E000 / E00 / R00 (skin), RV11 / R85 (pinks), E23 / 25 (browns)

***************************************

Challenges

My Mind's Eye - Use stamping with your My Mind's Eye products
The Paper Girls Challenge is a photo inspiration.  I used colors in the photo on my layout.

Catered Crop (sun) - use circles ( I have lots of circles in my doily, buttons, and paper embellishments )
deadline Oct 27th 8pm
Catered Crop


Red Carpet Studio (sun) - is looking for a Scrapbook Layout with polka dots, circles or a ring (I have polka dots on the paper pieced dress and some of the paper emblishments as well as circular elements)
deadline Oct 27th 11pm
Cupcake Craft Challenge (mon) - paper piecing
Make it Monday - anything goes every week
Ink Impressions (wed) - anything but a card
Ladybug Crafts (wed) - favorite embellishment (my favorite embellishment is to create my own using my stamps and my second choice is lace / trim )
Let's Craft and Create (wed) - add dimension
deadline Oct 30th 6pm CST (they are in the UK)
Word Art Wednesday - "Every good gift and perfect gift is from above, and comes down from the Father of lights" James 1:17 ( My family is the greatest gift my heavenly Father could have ever given me.  I'm hoping He will bless us with some additions so I can be a grandma someday.  That would be one of the biggest blessings of all!!)
Oozak's (monthly) - die cuts (I used my doily die)


Tuesday, April 24, 2012

Seize the Cupcake by Hero Arts


Hello Stampers!  Today I'm sharing another card I created for the Hero Arts monthly challenge.  If you want to join my, the deadline is 4/26 and you can read all the details HERE.  There are 3 sketches to choose from and a couple of other catagories as well.  I used "Seize the Cupcake" stamp set for this one.  You have to have a Flickr account to play along. 

ha-april2012-sketches

thanks for stopping by!
hugs, Melisa


You can view all of my Hero Arts projects HERE.


*****************************************************

Projects Details
Stamps : Hero Arts
Patterned Paper : ColorBok (yellow), MME Sunshine (blue polka dots), MME Portobello Road (blue floral), MME Madison Ave (pink for scalloped circle)
Deckled Scissors
Spellbinders : Lacey Circles, classic circles
Ribbon MME

***************************************************

Challenges

Stampin' Sisters in Christ (sun) - soft pastels
Love to Create  (mon) - anything goes
Creative Card Crew (tues) - ribbon
Flourishes (tues) - ribbon, diecut, pink BINGO
Fussy and Fancy - dies and punches
Mark's Finest Papers (sat) - stitching


Monday, April 23, 2012

Sweet n' Sassy "Bee Happy Rhubarb"


Good Morning Stampers!  Today I am sharing another cutie patootie from Sweet 'n Sassy.  I also want to let you know about the beary awesome sale Sweet 'n Sassy has going on until Wed.  40% OFF!! everything!!  Check out the details HERESo if you have been thinking about picking up some Sweet 'n Sassy, now's the time to do it.  I got my order in on Sunday.  This one was designed using the sketch challenge over at the Sweet Stop Sketch Challenge Blog HERE.  A new challenge is posted every saturday.  But if digital images are more your style, then you can play along on the Sweet 'n Sassy Digi Challenge Blog HERE for a chance at winning some fabulous images!

I hope you have a beary nice week!
hugs, Melisa

You can view all of my Sweet n' Sassy projects HERE.

*********************************************************************

Project Details
Stamps : Sweet 'n Sassy "Bee Happy Rhubarb"
Patterned Paper : My Mind's Eye Lost and Found - Madison Ave.  6 x 6 paper pad (you can get this one at Hobby Lobby)
Copic Markers E23, E25, E59  RV11, R81,  E53 (ears, nose, bee-hive)
Glitter Glue : Stickles - Cotton Candy 
Spellbinders Lacey Circles die and 1 3/4" Paper Shapers Punch
Hand Cut scalloped border using a chipboard peice as a guideline

************************************************************************

Challenges


Corrosive (sun) - from a bottle (glitter glue)
Paper Sundaes (sun) - let's get cute
Stamptacular Sunday (sun) - loads of layers
The Crazy Challenge (mon) - girly
Paperplay (thur) - animals
Crafty Catz (fri) - stripes
Fussy and Fancy (fri) - Punches and dies
Secret Crafter (sat) - movie title "Winnie the Pooh"
By the Cute and Girly (monthly) - Winnie the Pooh

Tuesday, April 17, 2012

Sweet 'n Sassy "Owl Be There"


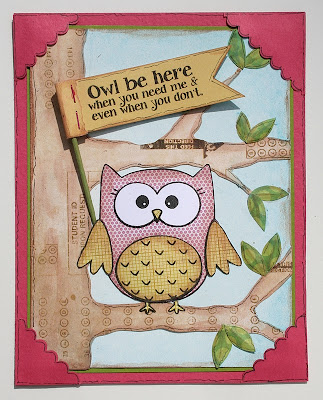
Hello Paper Crafters!  I'm back today with another card created using "Owl Be There" by Sweet N Sassy.   Lots of paper piecing on this one, but it really doesn't take long.  I bought some PanPastels a while back and  wanted to try them so I used them to create the sky.  Basically you use a spongy pad, kinda like a make-up pad and rub them on.  They are ok, but not sure I would buy more.   I could brush blue water color paint on for a lot cheaper.  The rest was paper pieced.  I used my brown NeoColor II watercolor crayon around edges, on tree, and around all other pieces. 

thanks for stopping by!
Owl be back next tuesday with my next Sweet n Sassy project!
Melisa

You can view all of my Sweet n' Sassy projects HERE.


***************************************************
  
Project Details
Stamps : Sweet 'n Sassy "Owl Be There"
Colorization : PanPastels, "Turquoise Tint" and "Turquoise"
NeoColor II Brown #59
Patterned Paper : Bo-Bunny 12 x 12 Et Cetera Ledger (tree), My Mind's Eye 6 x 6 paper pad - Blush II (pink polka dot) and Lime Twist (green polka dots), Basic Grey 6 x6 paper pad "Origins" 2009 (yellow).
Scalloped Scissors : Fiskars
Mini Attacher / Stamples : Tim Holtz
tooth pick

*************************************************
Challenges
Love to Create (mon) - friends
What if ? (wed) - birds of a feather
Totally Paper Crafts (fri) - things with wings
Wags N Whiskars (fri) - anything goes

I WON!!!
 I won $10 free digi's from Digi Doodle Shop

Sunday, April 15, 2012

Mixed Media Art Journal Project


I finished 2 more pages in my art journal today.  So much fun!  I started with color inspiration from the Color Throwdown challenge blog and added the scripture from this weeks Word Art Wednesday challenge.


1. I started with 2 gesso coated book pages.  I used a thin layer so that the words were visible.

2. Scribble some blue (#47 Lyra Aquacolor) over the background and then brush water on to spread the paint.

3. Lay stencil (I used a circular medallion from Layers of Color) and sponge on purple watered down acrylic paint over the openings on the inside of the medallion and very lightly around the edges. 
4.  Pounce on watered down yellow acrylic paint over sequin waste (punchanella). 

5. Smear on some green paint with finger.

6. Spray with Work Fixative and dry with heat gun.  May not have been necessary, but before I started layering more color, I wanted to set what I had already added.


7. Roll on brown ink (Brilliance Pearlescent Chocolate by Tsukineko) using Jumbo Rollagraph Stamp Wheel with the Floral Flourish image around edges and in a few area's in center. I didn't want the full image, so I rolled lightly. You could use any type decorative stamp, but I like that the Rollagraph makes it easy for me to lightly roll and get a partial image. 

8. Wipe brown ink around edges. I used a little water on my fingers to smear it.

9.  Apply white acrylic paint with bubble wrap.


10.  Stamp Stampendous Music Score  on watercolor paper multiple times with water resistant ink (I used Palette Noir and then ran the heat gun over it a couple of times just to be safe).  Brush watered down white acrylic paint over some of the music score images (for picket fence and flower centers) and yellow watereed down paint over the rest (for sun). 

11. Hand cut fence and sun pieces.  Scribble around edges of all pieces with brown #59 Neocolor II crayon and smear with ZIG H20 Brush.  LOVE these brush's!  They come in different sizes and I just wipe them off on paper towels in between colors.


12.  Tear green patterned paper and adhere along the bottom of pages.  Only adhere along the bottom edge so you can slip the ends of fence and stems in later.  Use brown watercolor crayon around edges of grass.

13. Adhere fence and sun.

14. Cut flower #1 / heart flowers from purple patterned paper. Brush on yellow watered down yellow paint onto watercolor paper and cut flower #2.  Cut all flower centers from the white music score paper created earlier.  Cut leaves / stems from green patterned paper.  Add / smear brown watercolor crayon around edges of all pieces. 

15. Print scripture and cut into tag.  Tear one end.  Add / smear brown watercolor crayon around edges of tag.  Adhere tag to page and add bow.

16. Adhere stems, leaves, and flowers.  Before adhering leaves, crumble and crease.  Adhere ends of grass to page.  Embellish with buttons.  Doodle.

Thanks for stopping by!!
Melisa

See all my MIXED MEDIA TUTORIALS HERE
See all my MIXED MEDIA / COLLAGE PROJECTS HERE
See all my ART JOURNAL PROJECTS HERE
View all my Faith Art projects HERE.

*****************************************************

Linked to :


A Crafty Soiree


****************************************************

Challenges


Word Art Wednesday (wed) - Psalm 28:7
For Fun (wed) - tags (handmade tag with scripture on it)
Little Red Wagon (wed) - spring
Crop Stop (thur) - buttons and bows
Lily Pad (fri) - flowers
Crafty Emma's (sat) - paper piece
Inspiration Emporium (montly) - watercolor
Sketchbook Challenge (monthly) - open


Tuesday, April 10, 2012

Sweet 'n Sassy's "Owl Be There"


Good Morning Paper Crafters. Today I'm sharing the other 2 cards I created using "Owl Be There" by Sweet 'n Sassy.   Such a cute little friendship set.  I was inspired to create these when I saw a Color Throwdown challenge posted last week, to use the colors from the Mabel paper pad by My Mind's Eye.  If you are like me you have a pile of those little 6 x 6 paper pads laying around. The small paper pads are perfect for paper piecing stamped images because the patterns are so small. So think of all the options for creating your own little set of cards using this set and your paper pads.  


Soooooo many possibilites with this image!  Wouldn't the image be cute with a little bow on the head for a girl, oh and what about a party hat??? That would make a great birthday card! You could have him sitting on top of a birthday gift. I'm trying to think of other things we could tuck under his wing .... what about a book and a graduates hat on his head .... or a balloon.

Another great idea would be to put two of them standing side by side with their wings touching so they look like they are holding hands. There just may be enough room between the wings to have him holding a banner. We can have a lot of fun with this little guy!

I'd love to know what idea's you have. If you would like to share an idea or a card you created using this little guy just leave me a comment with a link to your card.

Hope you're day is a hoot!
hugs, Melisa

You can view all of my Sweet n' Sassy projects HERE.

*************************************************

Project Details
Stamps : Sweet N' Sassy "Owl Be There"
Patterned Paper : My Mind's Eye 6x6 paper pad "Mabel"
Cardboard Flowers : Jillibean Soup
Buttons : Papertrey Ink
Embossing Folder : Cuttlebug
Border Punch : Fiskars
Spellbinders Classic Oval dies
Mini Stapler : Ranger
Card #1
Create a top from cream cardstock.  Emboss card front with embossing folder.  Trim patterned paper 1" x 4 1/4".  Punch scalloped border.  Adhere together and wrap with twine, threading through buttons as you wrap.  Adhere panel to card front.  Stamp owl and paper piece.  Paint tooth pick.  Stamp sentiment on patterned paper and trim creating a flag.  Wrap end of flag around tooth pick and staple with mini stapler.  Adhere owl and flag to card front.  Doodle around edges.
Card #2
Trim cream cardstock 4 1/4" x 5 1/2", emboss, and adhere to card front.  Trim floral patterned paper panel 2 1/4" x 4 1/2".  Punch scalloped border.  Stamp owl, and paper piece.  Adhere buttons to center of cardboard flowers.  Cut oval with Spellbinders oval die.  Stamp sentiment.  Adhere all pieces to card front.  Doodle around edges.

*************************************************
Challenges
Paper Sundaes (sun) - kraft / diecut (flowers and circle)
4 Crafty Chicks (thur) - flowers
CCEE (thur) - embossing folder
Charisma Cardz (thur) - chipboard
Stamp, Scrap, and Doodle (sat) - things with wings
ABC - anything goes
Stampendous - re-use, re-purpose (tooth pick)
Cupcake Craft (mon) - spring is in the air
Splitcoast Stampers (mon) - scallops

*********************************************

Card #2 was featured at :

Sunday, April 8, 2012

Sweet n' Sassy "Owl Be There"


This is another one of the new releases from Sweet 'n Sassy this month, "Owl Be There"!  Another cutie patootie!   It's so much fun to paper piece this little guy.  This is a card from a 3 card set I am sending to Take Ten for their Variation on a Theme.  I will be sharing the other 2 on tuesday.  See ya then!

You can view all of my Sweet n' Sassy projects HERE.

******************************************************

Project Details
Stamps : Sweet N' Sassy "Owl Be There"
Patterned Paper : My Mind's Eye 6x6 paper pad "Mabel"
Buttons : Papertrey Ink
Embossing Folder : Cuttlebug
Border Punch : Fiskars
Create a top-fold card from cream cardstock. Emboss card front with embossing folder. Trim patterned paper 2 1/4" x 4 1/4". Punch scalloped border from patterned paper and adhere along top of othere panel. Wrap with twine and tie bow. Adhere to card front. Stamp owl and paper piece. Stamp sentiment on cream cardstock, trim creating a flag, and adhere button. Adhere owl and flag to card front. Doodle around edges.

***************************************************

Challenges

My Mum's Craft Shop (wed) - animals
Papercraft Star (wed) - anything goes
Fab N Funky (wed) - embossing
Crafty Catz (fri) - clean and simple
Color Throwdown (wed) - color challenge

Wednesday, March 21, 2012

MIXED MEDIA / ART JOURNAL PROJECT


When I started the "Art of Wild Endangerment" class, I told myself I was going to just stick to sketching in a sketch book right now, because I seriously have sooooooo many other things I need to be doing.   But ....... the more I watched Junelle add her art to her altered book  .... I had to take the time to get my own started.  So I selected an old book, tore / cut out pages about every 4 page and started adding gesso.  I used gesso to adhere 4 page together at a time so my pages would be sturdy.  After I removed pages and adhere some together, I started adding gesso to all the pages and outside of the book.  Then I added my first sketch / art journal project!  I haven't journaled yet, but left space so I could add that later.  I'm addicted!  I have to work the next 2 days, so I really do need to get some house work done, teehee.  But I just want to work on my journal!  This is what my daughter would refer to as a "first world problem".

So I decided to take the time to share my step by step process, just in case someone is interested in giving it a try.  Below you can find my VERY long, and very boring explanation!  Other wise that's it for the day!  thanks for stopping by and I hope you have a joyful day creating!
hugs, Melisa

See all my MIXED MEDIA TUTORIALS HERE
See all my MIXED MEDIA / COLLAGE PROJECTS HERE
See all my ART JOURNAL PROJECTS HERE


*************************************************

Project Details 

I started out creating a blue background using water color paint and a "mop" paint brush.  I would put a little on and then use a paper towel to dab some off til I got the look I wanted.  I didn't wand a solid background on this one.  Not sure you can tell on the photo, but some of the white gesso is showing through. 


I had a old flourish stamp that had the cool deco leaves on it, so I used that as my inspiration and started by sketching (with a mechanical 07 pencil) flourish's.  Then I sketched the "deco leaves".  At this point you could just paint them in, but I decided I wanted to paper piece these.  Sooooo ...  I used tracing paper to trace each one, then positioned the traced deco leaf over the patterned paper.  After I was happy with where it was positioned over the patterned paper, I slid some carbon paper under the tracing paper and lightly penciled over the design, transferring onto the patterned paper.  Now you just trim and adhere.  I had to decide how I wanted to adhere the paper.  I could use Mod Podge, but that gets a little messy and usually ends smearing from underneath whatever I gluing down, leaving a shiney area.  Or I could use my Aleene's Tachy Glue.  When I took Christy Tomlison's "She Art" class, she Mod Podged everything.  I think because she liked how she could continue to smear her Neocolors or other mediums over it.  She also applied the Pitt pens over the Mod Podge as well and then was able to smear it to add shadow / distressing.  So I decided to go with Mod Podge.  But at this point, I didn't cover the whole page, just used it to adhere my paper pieces.   The smaller leaves were much easier.  I did't bother sketching them, because that's such and easy shape to cut.  So I cut a bunch of them from differnet patterned papers, positioned them on the page, and adhere.  Next I used a green water color pencil add added paint over all my sketched stems / vines.  I didn't put the color directly on the page.  I wet my brush, wipe the end of the brush over the end of the pencil to pick up the paint and then apply it to the page.


Next I trimmed patterned paper to create the bird house and a few of the banner flags (green).  I didn't have the right color patterned paper for the other colors, so I applied watercolor paint to some watercolor paper and cut them.  I used a font stencil for the letters on the banner.  Punch little holes in the corners (Fiskar's 1/16" ?? I think) and ran jute through them.  Adhered those pieces on with Mod Podge as well.


I sketched my birds on watercolor paper, add watercolor paints, and trimmed.  Adhered with Mod Podge.  This was my first time sketching birds.  I used a couple of my stamps (the ones on the project I posted monday) to inspire me.


Junelle likes to add little splatters of color to her art.  She makes it look so easy.  Hers look way better than mine.  Basically I just soak a brush wtih watercolor paint and then lightly tap it over the project. 

Next I tried to do some doodling.  I had some new pens from Prismacolor and started with those.  Basically I was trying to outline / sketch the lines in now with a black pen / marker.  But it wasn't working out over the Mod Podged area's or watercolored area's (stems / vines).  I think I ruined my pens trying it, because they stopped writing  : (  and I haven't been able to get them going again.  I also tried my Micron Pens, same problem.  I'm not sure why.  Maybe I just needed to let it sit a little longer.  I thought the watercolored area's were dry.  I used the Prismacolor 03 pen and my sharpie on Monday's project over the watercolored background and they worked fine ???  I was very frustrated, because the heart of Christy and Junelle's art is their sketching / doodling with the pen.  The project just isn't finished without it.  So at this point I decided to Mod Podge the whole thing and try a pen Christy recommends.  Here's the problem with her pen ... you can only by it at her shop (seriously ... the company discontinued them and she had them specialed ordered) and they have a wider tip, which I'm not crazy about.  I prefer an 03.  But this pen will write on anything.  After I dried the Mod Podge, I decided to give one more pen a try,  a fine tip sharpie.  I had issue with that one as well : ( .  So I finally went with Christy's pen.  You can find it HERE

Next I used acrylic paint and punchanella to add the circles you see here and there.  I started wtih the brighter colors and then went over them with white paint to tone it down.

The set from the photo above is HERE.
Scarlett Lime actually has some Punchanella in a "texture" kit HERE.  Christy showed us how to use these pieces in her She Art class to add interest to our backgrounds. 

All that's left to do is add some journaling.

If you are new to mixed media and are interested in online classes.  Check out THIS post for a list of online classes (some of them FREE) I am aware of.


Related Posts Plugin for WordPress, Blogger...