Showing posts with label Theme - Christmas Ornament. Show all posts

Saturday, December 17, 2011

Merry Christmas from our home to yours!


Hello friends.  Just wanted to share some photo's of our tree's and wish everyone a Merry Christmas!  It was so nice to be in our home this year (last year we were in a rental) and get all the Christmas decorations out.  I had forgotten how much work it was though.  I missed my daughter helping me.  Nicole if you are reading this  ....  Christmas will not be the same without you this year.  I love you and miss you! 


"1 And it came to pass in those days, that there went out a decree from Caesar Augustus, that all the world should be taxed... 4 And Joseph also went up from Galilee, out of the city of Nazareth, into Judaea, unto the city of David, which is called Bethlehem; (because he was of the house and lineage of David:) 5 To be taxed with Mary his espoused wife, being great with Child" (Luke 2:1, 4-5).


"6 And so it was, that, while they were there, the days were accomplished that she should be delivered. 7 And she brought forth her firstborn Son, and wrapped Him in swaddling clothes, and laid Him in a manger; because there was no room for them in the inn" (Luke 2:6-7).


"8 And there were in the same country shepherds abiding in the field, keeping watch over their flock by night... 10 And the angel said unto them, Fear not: for, behold, I bring you good tidings of great joy, which shall be to all people" (Luke 2:8,10).


"And this shall be a sign unto you; Ye shall find the Babe wrapped in swaddling clothes, lying in a manger" (Luke 2:12).


"Glory to God in the highest, and on Earth peace, good will toward men" (Luke 2:14).


"15 And it came to pass, as the angels were gone away from them into Heaven, the shepherds said one to another, Let us now go even unto Bethlehem, and see this thing which is come to pass, which the LORD hath made known unto us. 16 And they came with haste, and found Mary, and Joseph, and the Babe lying in a manger" (Luke 2:15-16).


If you have shared photo's of your tree, I would love to see them!  Just email me a link, or leave me a comment with a link!

Merry Christmas!

Wednesday, October 26, 2011

Noel Christmas Ornament

Ornament #1

Today I'm sharing some handmade ornaments!  I hope you are inspired to create some of your own.

You can find more of my handmade ornaments, including my "5 Star / 1 Cut Ornament" tutorial  HERE

I would love to see your handmade ornaments if you post them.  Just email me, or leave me a comment on my blog when you are finished!
Hugs, Melisa
**************************************************

Project Details

My first ornament is pretty easy to create.  I cut 2 1 1/2" strips from cream patterned paper.  I scored every 1/2" to create pleats.  Before folding back and forth to create pleats, embellish edges with gold glitter glue. Punch a 2" circle to use as a base to stabalize the pleated base.  Glue the ends of the strips together at the ends.  Then glue the entire pleated background to the 2" circle.  Created the red ruffled piece from crepe paper.  It's the kind you get in the party section at local craft store.  I used thread and a needle to gather the edge of the crepe paper strip.  Adhere to center of pleated base.  Cut scalloped circle from cream cardstock using Spellbinders Classic Scalloped Circles and the Grand Calibur. Adhere to front of ornament.  Embellish edges with gold glitter glue.  Stamp "Noel" from Layers of Color art stamp set "Christmas Verses" onto cream cardstock and trim.  Adhere to front of ornament and embellish with glitter glue.  Stamp dove (from "Angelic" art stamp set) on cream cardstock, trim, adhere, and embellish with glitter glue. 

 
Ornament #2

To create this ornament, begin with the one of the decorative dies from  the "Fluer de Lis" die set by Spellbinders.  Cut 3 from cream cardstock.  Score down the center of each one.  Then use the "Classic Scalloped Circles" die set and cut 3 scalloped circles from cream cardstock.   Score down the center.  Stamp decorative image from Layers of Color "Touch of Elegance" art stamp set with VersaMark ink and emboss with gold embossing powder.  Then you can use glitter glue around the edges.  I did not do it that way, but it would be easier for you if you have embossing powder and glitter glue that coordinate.  I wanted the stamped image and glitter around the edges to match, so I stamped the image with a Glue Pad and sprinkled with gold glitter.  Then I added glue with a glue pen around the edges and sprinkled with glitter.  This is a more difficult way to do it, because the glue pad did not completely hold the glitter and it was easy to knock off.  So then I sprayed over it with several coats of Fixative Spray.  After dried, fold along score lines of both the scalloped circles and the decorative die shapes.  Adhere each scalloped circle to the front of the decorative die shape.  You now have 3 sides.  Adhere 1/2 of #1 to 1/2 of #2.  I use Aleene's Tachy Glue.  Adhere 1/2 of #2 to 1/2 of #3.  Before you adhere 1/2 of #3 to 1/2 of #1, you need to set your gold cord down the middle of the ornament.  Cut the gold cord long enough to form a loop at the top with the end being adhered inside the ornament.  Leave a long piece of the other end hanging out the bottom so you can embellish with beads and an images.  Do not leave both ends extending from the bottom of the ornament unless you know for sure that your beads will fit on 2 pieces.  The inside of my beads were so small, that I could not feed 2 pieces of the cord through them.   I secured the cord inside the ornament using Aleene's Tachy Glue.  After the glue is dry and cord secured, adhere 1/2 of #3 to 1/2 of #1.


Finish your ornament by adding a bead cap and several beads.  Tie a knot at the end of the last bead, but leave a tail hanging do you can add your image.  Color image and embellish with gold glitter.  Trim and adhere to end of cord.

Tuesday, October 25, 2011

Mark's Finest Papers Ornament Blog Hop


Good Morning Paper Crafters.  I just wanted to pop in and let you know that tomorrow's "12 Days of Christmas" Blog Hop with Mark's Finest Papers is all about ornaments!!  The "12 Days of Christmas" Blog Hop acutally started Oct 17th.  Each day had a different theme and you can go back and check out all the wonderful projects by starting on the Mark's Finest Papers Blog HERE.


Tomorrow I will be sharing my projects for the Layers of Color Ornament Blog Hop.  I hope you will join us!
Melisa


*****************************************

Project Details

Stamps : Mark's Finest Papers "Seasonal Poinsettia's"

I started with a paper mache ornament you can pick up at a local craft store, and altered it.  I painted the sides and back a gold color.  Glued the front of the ornament to a larger peice of patterned paper.  After the glue was dry, I trimmed around the edges with an Exacto knife.  I used my Basic Grey File Set to smooth out the edges.  The edges were then distressed with ink.  I embellished the top and bottom point with gold paper.  Stamp the poinsettia image x 4 on white cardstock, color with Copics, and trim.  I trimed out some of the center petals from 2 of the images so that I could layer and pop them up.  Adhere to front of ornament.  Stamp sentiment.


Monday, October 17, 2011

GinaK Designs Christmas Projects


Good Morning Paper Crafters!  Today I'm sharing a bunch of GinaK Designs Christmas Projects I designed a while back.  This one is a Christmas ornament using A Very Merry Christmas and Lovely Labels 2.


Photo card using The Magic of Christmas.


And here is a card using A Very Merry Christmas


Have a great day!
Melisa


************************************************

Project Details


Ornament
Ink : Tsukineko Brilliance Rocket Red, Copic Markers
Grand Calibur
Patterned Paper : Little Yellow Bicycle
Glitter glue : Stickles
Chipboard
Gold cord : local craft store

Using Spellbinders Nestibilities Labels Sixteen, cut 2 green and one chipboard labels.  Adhere green labels to both sides of the chipboard.  Stamp Lovely Label image on white cardstock with red ink.  Trim around edges, leaving a border as shown.  Adhere to front of ornament with red ink.  Trim around edges, leaving a border as shown.  Adhere to front of ornament.  Stamp bells image on white cardstock and color with markers.  Adhere to front of ornament.  Stamp sentiment.  Adhere ends of ribbon / hanger to back of ornament.  Embellish with glitter glue. 


Photo Card 

Stamps : GinaK The Magic of Christmas
Markers : Copic
Patterned Paper : The Girl's Paperie
Ribbon : Stampin' Up

Trim off white cardstock 4 1/4" x 5 1/2".  Trim patterned paper slightly smaller and adhere to cream panel.  Stamp ornaments on patterned paper slightly smaller and adhere to cream panel.  Stamp ornaments on patterned paper and then again on cream cardstock.  Color ornaments with markers, trim around bulbs (do not cut hangers) and adhere over ornaments on patterned paper.  Trim photo down and tie ribbon around end of photo.  Adhere to cream cardstock and trim around edges leaving a border.  Adhere to re cardstock and trim around edges with deckled scissors to create a border.  Stamp sentiment on cream cardstock and trim.  Adhere to red cardstock and trime around edges with deckled scissors.  Adhere photo and sentiment to card front.


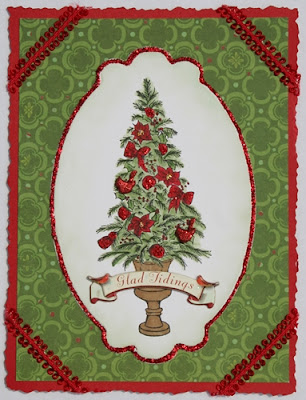
Glad Tidings Card

Stamps : GinaK Designs A Very Merry Christmas
Ink : Tsukineko Momento Tuxedo Black
Markers : Copic
Chalk : Pebbles Inc
Grand Calibur
Patterned Paper : The Girls Paperie Tinsel and Twig 2010
Glittered birds : Making Memories
Glitter Glue : Stickles
Chipboard sentiment : Bo-Bunny

Trim green patterned paper 4.5" x 6" and adhere to card front.  Trim white cardstock 4.25" x 5.75" and adhere to card front.  Trim red patterned paper 4" x 5.5" and adhere to card front.  Cut / emboss white cardstock using Spellbinders Labels Ten.  Stamp tree image and color with Copic markers.  Add green chalk around edges.  Add chipboard sentiment.  Embellish with glitter glue and glittered bird brads.  Adhere to card front.

Monday, September 19, 2011

Layers of Color New Release Blog Hop!


Good morning Paper Crafters and welcome to the new release blog hop of the Layers of Color Christmas Collection designed by Nina Brackett and Laura Kirste Campbell!
These special designs were created from the artist's hearts in celebration of Christ's birth.  You will find a few of the images coordinate with Spellbinders's dies (Joy & Peace - Labels 18 and Sentimental Banners with Ribbon Banners)! 
But if you have started at my blog, you will want to start at the Layers of Color blog and then hop around so that you can make sure you are entered into the Grand Prize Drawing!   Laura will give you full instructions on how to qualify on her blog.
If you have arrived from Linda's blog, then you are in the right place and keep scrolling to read how you can win a free stamp from me!
  I have created a Christmas Ornament using one of the decorative elements from "Touch of Elegance" and the dove from one of the new release sets "Glad Tidings".    You can check out all the details on how to create this one at the very bottom of my post.


I actually have 2 more Christmas ornament post coming up in the future. You can subscribe to my blog post via email if you like, so you don't miss a thing. Just check out the side bar gadget.  No worries, if you get sick of me, I promise I want be offended if you unsubscribe later.
One of the ornaments / tutorials will be posted on Wed. Oct 26th during the Layers of Color Christmas Ornament Blog Hop! 


I also have a Five Star 3-D (4 folds / 1 cut ) ornament tutorial I posted recently and after the hop I would love to invite you back to check it out HERE.
My Prize
Today I'm giving away "Holly Angel" cling art stamp (sample - meaning it's not packaged)!  All you have to do is leave me a comment.  You have until 12 noon EST to leave me a comment.  I will do a random drawing and post a winner as soon as I get off work Tuesday (late afternoon).  The winner will have til Wednesday 10am EST to contact me at luv_2_stamp@yahoo.com to claim your prize.
and here is a card I created using Holly Angel


The next stop in this hop is the very talented

Good luck in the drawings!

****************************************
Project Details Ornament

Stamps : Layers of Color "Touch of Elegance" and "Glad Tidings"
Cream Cardstock
Gold cord and beads
Stickles Champagne and Recollections Gold Glitter from Michaels
Tsukineko Glue Pad
2-Way Glue Pen
Krylon Matte Finish Clear Spray
Scor-pal
Aleene's Tachy Glue ($1.47 at Walmart.  I LOVE this stuff, use it all the time, and store it upside down in an empty peanut butter jar to keep it ready to go all the time.  The jar I use is actually plastic and it has a little dimple in the bottom)
I used a glue pad and gold glitter - not a great choice.  I recommend VersaMark and gold embossing powder.  I just didn't have an embossing powder that was gold or glittery enough to match my beads and I'm a little picky, teehee.
Cut 4 cream rectangles 2" x 2 5/5".  Locate the centers on each side and put a pencil dot.  Connect the dots with light pencil lines to create your diamond.  Score from top point to bottom point down center.  If you want that really glittery look, then you can do it like I did.  But I"m not resposible for any hair loss you may have along the way as I promise, you may want to pull it out, teehee.  But there is an easier way I'll share in a few minutes.  Wipe the cream diamond with an Embossing Magic or dryer sheet.  Stamp the decorative image on the diamond with a Glue Pad (Tsukineko), VersaMark may work, not sure.  Sprinkle with glitter.  It was a brilliant plan up until now!  Ha!    The glue pad doesn't completely hold the glitter and at this point it can be easily rubbed off.  So very carefully use a very fine brush to pick up any unwanted glitter, hopefully there is not much if you used Embossing Magic or your dryer sheet.  To fix the glitter in place spray it with a clear matte finish spray (Krylon).  But wait, one coat want do ...  I think I ended up with 3, making sure to let it dry in between coats.  I'm sorry there was just NO substitute embossing powder that gave me that glittery gold look I wanted.  And it matched my Champagne Stickles perfectly.   And for an easier method, just use VersaMagic and gold embossing powder.  After your 4 diamonds are dry, fold along the score line.  Adhere 2 at a time so that you now have 2 pairs.  Use a white tacky glue for this.  Measure and cut your gold cording.  You want to leave it looped at the top as your hanger or so you can attach a metal hanger, and leave lots extra coming out the bottom.  So tie off a loop at one end leaving the 2 tails hanging down.  Add tacky glue down the inside center of one side and all over the back side.  Glue the 2 side together.  You should now have the 2 gold tails haning out the bottom.  After it is dry, add beads.  Make sure you buy beads with holes big enough to thread the 2 pieces of the gold cording.  Tie a knot at the bottom of the beads to hold them in place.  Leave a little tail to adhere your image to.  Stamp the dove, trim, outline with 2-Way glue pen and sprinkle with gold glitter.  After it is dry, adhere to tail you left hanging below the beads.  When adhering actually hang the ornament, so you can get it adhered right where you want it.  Adhere Stickles around the edges.
I should have taken photo's.  The next ornament I post is similar and I will post step by step photo's with that one.

***************************************************
Project Details Holly Angel Card
Stamps : Layers of Color "Holly Angel" and "Sentimental Banners"
Copic Markers
Pink cardstock
Vellum with white snow flakes - unknown
doily
Ribbon - Offray double sided white satin ribbon
Deckled Scissors - Fiskars
Adhere front of A2 card to a larger peice of white cardstock.  Trim around edges with deckled scissors.  Trim pink cardstock and patterned vellum slightly smaller, wrap with white ribbon, tie bow and adhere to card front.  Adhere doily. Stamp angel and banner.  Color with Copic Markers.  Apply glue with 2-Way glue pen to wings, avoiding black lines as much as possible.  Sprinkle with glittern.  Use a tooth pick or paper poker to remove unwanted glitter over stamp lines.  After dried, adhere angel and banner to card front.
Thanks for stopping by!
Melisa

Monday, September 12, 2011

5 Star Ornament Tutorial


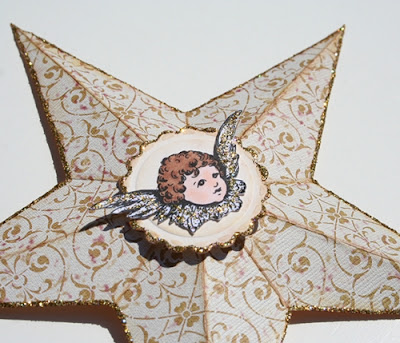
Good Morning Paper Crafters.  I have had so much fun creating projects with the Layers of Colors upcoming Christmas new release sets.  I ended up making several ornaments.  The first one is a 3-D 5 star ornament.  You make four folds and one cut.  I have included a photo tutorial that I hope will make it easy for you to create these as well.  If you do decide to create one, I'd love to see yours  ... just leave me a comment with a link.  I'm not sure when I will be posting them yet, but I have 4 more ornaments to share as well as a stocking gift card holder tutorial coming up ..... stay tuned!


AND ....  don't forget to join us Monday Sept 19th for the New Release Blog Hop where you will have the opportunity to win free stamps.  Want to see more new releases??  Check out the other LOC DT blogs ....  see the list and links in my side bar!


****  I did not create this template.  It is an origami technique that probably goes waaayyyyy back and who knows who created it.  I just want anyone to think I did.  I just wanted to create a tutorial to share with my readers ****


*************************************************

Project Details 
Stamps : Angelic art stamp set
patterned paper
Spellbinders : Classic Scalloped Circles Small
Grand Calibur
Glitter Glue : Glitz Stickles Champagne

Create 5 star ornament with patterned paper.  Ink peaks and valleys.  Cut scalloped circle using Spellbinders Scalloped Circles Small and Grand Calibur.  Stamp angel, color, and trim.  Adhere to scalloped circle and then adhere to ornament center.   Apply stickles around edges of the star and around edges of scalloped circle.  Create a small hole at top and string with gold cording.

**************************************************

Tutorial

Fold #1
Start with a 6x6 piece of paper.  Fold it in half.


Fold #2
Fold "Corner A" over to "B".  "B" is 1" down from top.


This is how it should look after you have made the fold.


Fold #3


Fold #4
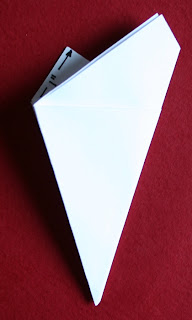
This is what it looks like after Fold #3.  The dashed line shows you where Fold #4 will be.  Make the fold to match up "D" with "E".


This is what it looks like after you do Fold #4

Cut 
Make the cut as shown.


Trash the top half and begin unfolding your star.

You will have to reverse some of the fold lines.  I reversed my valley fold lines upward so I could ink them, then pushed them back down.  Ink the top folds as well.  I used patterned paper to create mine.  You will not be able to complete all the folds with thick cardstock. 


Related Posts Plugin for WordPress, Blogger...