Showing posts with label Theme - Food / Fruit. Show all posts

Wednesday, June 26, 2013

Strawberry Treat Box and Shaped Card for The Cutting Cafe


Good morning friends.  Today I am sharing a sweet little treat / gift basket designed using "Strawberrry Treat Box" by The Cutting Cafe.  The choices for our DT assignment this week were the treat box above, "Strawberry Shaped Card", or the "Berry Sweet Greetings Printable Stamp Set".  The only thing extra I added was the scalloped mat at the bottom of my box.  Read more about how to create one below.  

The Cutting Cafe DT blog post up will be up later this afternoon.  Hop on over and check it out so you can  get lots of inspiration using these files HERE.  


All the files from The Cutting Cafe come in PDF, SVG and WPC.  I don't have a cutting machine.  I wanted to make sure the borders around the card matched.  After printing the images on cards I cut around each shape leaving about 1/8" border.  I lined the green leaves / stem over the strawberry and adhered it in the center with a piece of double sided adhesive tape.  I wanted to go back later and pop it up, so that's why I didn't adhere all of it down.  Next I created a folded card 5" x 7".  I adhered the strawberry to the front of it allowing part of the strawberry to hang over the fold edge.  I trimmed around the image, trimming off the part of the image that was hanging over the folded side.  I pulled the leaves / stem up and then adhered it with pop dots.  Of course if you have a cutter, then you let it do all the work, teehee.


Some of the files in the "Berry Sweet Greetings Printable Stamp Set" are already colored for you.  I printed the bingo card twice.  I trimmed around the bingo card with one of them and then layered it on black card stock.  I trimmed around the scallop on the other copy and layered it on black card stock.  I used pop dots to adhere the bingo card.  I was going to use the pre-colored strawberry's as well.  But my printer was acting up and you could see faint lines across the solid area's.  So I printed the images on card stock instead trimmed the pieces and then layered them.  Regina has great instructions on how to print just one image from a PDF page HERE.  I print mine first on printer paper.  The image is in the center of the page.  I use a piece of light tack tape to adhere a piece of card stock or patterned paper over the image, then run it back through the printer.  Make sure when you trim you paper you leave extra space at the top to run a piece of tape over it.


HOW TO CREATE A SCALLOPED BORDER MAT


The first thing you have to do is figure out what size to cut your rectangle mat before trimming the edges with the border punch.  So I measured from where the edge of the paper would be to where I wanted the edge of the treat box to be.  For this particular punch it ended up being 1 little line (1/16") short of 1/2".  Which = 7/16".  I guess you could just added a little more and made it 1/2". But that looked to wide to me.  

You need to multiple that measurement x 2.  7/16" x 2 = 7/8".  or if you prefer the 1/2" measurement .... 1/2"  x 2 = 1".  

The size of the bottom of the treat box is 2 " x 3 7/8".  So you would cut your mat 2 7/8" x 4 3/4"   (using the 7/8" + 2" and 7/8" + 3 7/8").  Now punch around all edges with your border punch and then adhere the box to it.  Clear as mud??  I hope that made sense.

Thanks so much for stopping by today!
hugs, Melisa


this one measured over from the edge of a scrap  piece of paper to the point I wanted the edge of the box.  This is a scalloped border punch by EK Success

Saturday, February 23, 2013

A couple of Gina K. Design cards


Hello friends.  I'm so glad it's Saturday.  We are hoping to fit a bike ride in later today with our daughter.  It's beautiful in Texas right now.  We are having our spring with high's in the 70's most days.  I spent some time organizing photo's this week, since I'm trying to get back into it on a regular basis.  The problem is that I love so many of the scrapbook products I see .... but so many of my photo's from years ago were in color .... and don't match.  Apparently orange and blue were colors my son looked great in!  I think I have to get over that feeling that everything has to match and just go for it.  I need grandchildren and more black and white photo's teehee.

I used to store my photo's in these plastic "Sterilite" drawers because it seemed like an easy way to thumb through them.  They were pretty much organized by year ... but a lot were not.  Sometimes I would pull multiple photo's out trying to match them up ... and then never file them back.  So there was a catch all drawer.  So I have filed 20 years of photo's in photo albums the last couple of months.  WHEW!  I have given up on an notion that I will scrapbook them all.  And who would want to sit down and look at that many scrapbook albums anyway.  I'm excited that I have them out of drawers and in albums where my family can flip through them and look at them.

I do have a couple of cards to share today I designed using some Gina K. Designs images.  I used "Retro Boutique"  on this one.  Isn't that dress so cute.  I wanted it to be something you would want to pull out of the closet for a special event.  I loved popping up the dress to make it 3-D.  It's hard to see, but I added a little black party streamer to create a ruffle along the bottom.  I also added some beaded trim (Hobby Lobby).  The patterned paper is from Hobby Lobby.  


I used "Garden Fresh" for this card.  I thought the plaid ruffle trim and raffia gave it a cute farm fresh feel.  This set comes with more cute fruit / veggies and phrases.

I hope you have a fun and fabulous weekend!
hugs, Melisa

You can check out all of my Gina K. Designs Projects HERE.

Tuesday, April 24, 2012

Seize the Cupcake by Hero Arts


Hello Stampers!  Today I'm sharing another card I created for the Hero Arts monthly challenge.  If you want to join my, the deadline is 4/26 and you can read all the details HERE.  There are 3 sketches to choose from and a couple of other catagories as well.  I used "Seize the Cupcake" stamp set for this one.  You have to have a Flickr account to play along. 

ha-april2012-sketches

thanks for stopping by!
hugs, Melisa


You can view all of my Hero Arts projects HERE.


*****************************************************

Projects Details
Stamps : Hero Arts
Patterned Paper : ColorBok (yellow), MME Sunshine (blue polka dots), MME Portobello Road (blue floral), MME Madison Ave (pink for scalloped circle)
Deckled Scissors
Spellbinders : Lacey Circles, classic circles
Ribbon MME

***************************************************

Challenges

Stampin' Sisters in Christ (sun) - soft pastels
Love to Create  (mon) - anything goes
Creative Card Crew (tues) - ribbon
Flourishes (tues) - ribbon, diecut, pink BINGO
Fussy and Fancy - dies and punches
Mark's Finest Papers (sat) - stitching


Thursday, February 23, 2012

Artist Trading Card / Mark's Finest Papers

2.5" x 3.5" Artist Trading Card

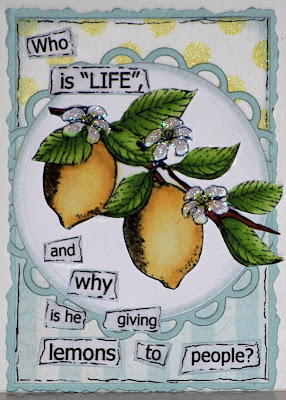
I'm back today using "Pucker Up".  This time I created an ATC.  I also used one of my new stencils by Crafter's Workshop "Mini Swiss Stamps".  I sprayed some "Daffodil" Glimmer Mist over it onto water color paper.   This is a FUN set!
I hope you haven't had any lemons thrown your way this week!
Melisa

*************************************************

Project Details
Stamps : Mark's Finest Papers "Pucker Up"
Spellbinders : "Standard Circles", and "Lacey Circles"


You can view all of my ATC's HERE


Thursday, February 9, 2012

Mark's Finest Paper's Pucker UP


Today I'm sharing another card I designed using "Pucker Up" by Mark's Finest Papers.  Isn't this a cute sentiment.  I used Glimmer Mist - Lemongrass with a Crafter's Workshop stencil (Mini Swiss Dots) to create the polka dot background.  Then I soaked up the excess with the crepe paper.  I used water color paper and sprayed one area solid yellow to use for the lemons.  Then I added a darker shade of yellow with a water color crayon to add some depth.


The lemons on the inside were cut from a copy of my master board.
Hope your having a crafty week!
Melisa

*****************************************************
Project Details
Pattered Paper is from one of my My Mind's Eyes 6 x 6 paper pads
Glitter Mist Lemongrass
Glitter Glue over flowers
Ribbon - unknown
pearls - Hobby Lobby

****************************************************

Challenges

Mark's Finest Papers - spray mist
Papertake Weekly - Anything Goes
ABC - 2 of something (2 lemons)

Wednesday, February 8, 2012

Creating a Masterboard


Today I'm sharing a card that utilizes a copy of a Master Board.  I discovered the concept of "creating a Master Board" in one of the Stampington and Company publications, Take Ten.  Basically you create your own patterned paper, scan it, and then print sheets out to use in your artwork.  For this Master Board I used this lemon image from "Pucker Up" by Mark's Finest Papers.  Honestly  as much as I like this background, there is no way I would ever sit down and individually create / color it.  It would take forever.  But now that I"ve scanned it, I can print out my own lemon patterned paper anytime I want!

Check out a tutorial HERE
I hope you are inspired to create your own Master Board to use as background patterned paper as well!
Thanks for stopping by!
Melisa

**********************************************************

Project Details
Stamps : "Pucker Up" Mark's Finest Papers
Embossing Folder : Swiss Dots Cuttlebug
Border Punch : EK Success
Clear glitter glue on flowers
Copic Markers:
Yellows - Y0000, Y11, Y26
Greens -  G20, YG03, YG17
Brown : E57
Grey : N0 (flower petal shadow)
********************************************************
Challenges
Sketch - CPS


Stamp, Scrap, and Doodle - Die cuts or punches
Related Posts Plugin for WordPress, Blogger...