Showing posts with label Tutorial - Frames / Spellbinders. Show all posts

Wednesday, July 21, 2010

More Layers of Color to share!


Good Morning!  Today I have more Layers of Colors projects to share with you.  I am really enjoying creating with their stamps this month.  They are just gorgeous.  If you haven't ever seen them, then hop on over and check out the store.  And while you are there, check out the wonderful stencils too. 


The Background
I started with a panel of old book paper.  I stamped the same decorative element repeatedly to create the background pattern.  I used a T-Square to draw light pencil lines as I went along to help me line up the images.

The Frame
Here is another example of how to use a spellbinders die to build a frame.  I started by using a pencil to lightly trace around the die.  These guidelines help me to know where to stamp the rest of the frame.  Then I stamped the decorative image along the top and bottom.  After the ink was dry I layed the die back down and traced the outline again, but this time with my micron pen.  I erased any pencils lines that were visible.  Next you just cut out along the edges of your frame.  I used cuticle scissors along some of the edges.

Both of these decorative images are from the set "Touch of Elegance".


And this lovely bowl of blooms is from the "Vintage Roses" set.

***********************************************************

Gift Bag - T-Square Tutorial
The next project is a gift bag that I designed myself.  And I will share the pattern with you below.


I started by creating my little bag out of my DP.  But before folding and adhering all of it I stamped the background pattern.
I stamped over the DP with 2 swirlies, and heat embossed.  Looks way better in real life.  I used one swirly from "Nature Walk" and the other from "Old World Flourish" .  Then I stamped my bird (Royal Birds) and flowers (Merci Bouquet), and cut them out.  I adnered these over my Cuttlebug Label Die.


You can see from this post that so many of the Layers of Color stamp sets go beautifully together!


Here is the template.  I started with a 7" x 12" sheet of heavy DP.  I used a T-Square to lightly draw my pencil lines and keep everthing lined up.  I scored the lines with my Score- Pal and then trimmed where needed.  I used a decorative border punch along the top.  If you are not familiar with a T-Square here is a photo.


You can pick one up at a local office supply store.  Some of the craft stores carry them too.  They are found in the "drafting" department and only cost a couple of dollars.  I use mine all the time to line things up across my projects.


Basically you line the short side along the edge of your paper / card and the longer side provides a perfect perpendicular / horizontal guide for you.
Hope that is clear as mud!

Have a great day!

Wednesday, July 14, 2010

Layers of Color Scrapbooking!

Double post today, because I am double blessed!!  I'm am blessed to be on both the Layers of Color and Mark's Finest Papers' this month.

Today I am sharing projects I created using 2 of Layers of Color stamps sets.

This 12x12 Layout features "Joyful Noise" .   As soon as I saw this set I fell in love and new I would be able to use it for more than just card making, since my daughter plays the violin.  I used the butterfly, treble clef, and musical flourishes.  But there are 2 other stamps in the set, so take a peak at the link above.
I wish you could see it up close.  I used old music paper and distressed it to create the border along the side.  And the background DP is so cool.  All the flourishes are velvety feeling.


Frame Tutorial
I started by drawing the outlines of a rectangular frame on cardstock.  The outside measurement was 4 3/4" x 5 3/4"  and the inside was 3/4".  You want your pencils lines light enough to go back and erase later.  Then I stamped and embossed the musical flourish around the inside of the frame, allowing some parts to extend outside the lines of the frame.  I decided which parts of the flourishes that extended outside of the frame I wanted to keep.  I used an Exacto Knife and metal ruler to begin trimming along the pencil lines, making sure not to cut off the part of the flourishes I wanted to keep.  Then I used sissors to trim around the the parts that extended outside the frame.  The I adhered this peice to the brown paper and began trimming to create a mat.


Flower Tutorial
I made my own paper flower on this one.  Very simple to do.  I cut multiple sizes using my Spellbinders Scalloped Circles dies from old book paper.  Before cutting, I had colorized the paper using some pigment ink.  I simple folded over and layered the different scalloped circles until I got a shabby look.


The card below features "Royal Birds" and "Touch of Elegance".  These images are just a sneak peak of the whole sets, so make sure you click the links about and check them out!


Frame Tutorial using Spellbinders
Begin by tracing around the edges of a Spellbinders die - Classic Frames on patterned paper or cardstock using a marker to create the frame.  Then stamp the decorative swirlies at the top and bottom.  Trim around the inside and outside of the frame.  


I have had so much fun designing with these stamps, they are just gorgeous!!

Thanks for stopping by!

Sunday, January 10, 2010

Crafty Secrets Cherish Stamp Set


12x12 Layout
I designed this vintage style layout using the "Flourishes" and "Cherish" stamp sets from Crafty Secrets.  I love their stamps and I can't wait til the new release that is coming very soon!!


Frame and Masking Tutorial
This is a close-up of the frame I built using masking tape.  If you take a look at the stamp sets, you can see that I used a couple from Cherish, but most of the frame was built using one stamp from the Flourish set and stamping it over and over, masking where needed.  I started with a penciled frame (rectangle) as guidelines on off-white cardstock.  I used the photo size to determine the size of the inside window.  I started stamping in the lower left corner and then continued up the left side, across the top, down the right side, and across the bottom.  I stamped the first image on the left lower corner of the frame and again on Eclipse Masking tape.  I trimmed the image from the Masking tape and then layed it over the same image I had just stamped on the project, masking - or protecting it.  Then I stamped the second image up the left side - "love" and again on Eclipse Masking tape.  Trimmed it and layed it over the same image on the project.  At this point I started using the one flourish image to finish the frame.  Again stamped the image on the project and again on Eclipse Masking Tape.  Trimmed it and layed it over the one on the project.  Seeing a pattern?  Here's the good news ... I can use the same flourish mask the rest of the way around the frame!  I know it's a little extra work creating the mask, but it will be worth it once you finish!  Giving you a one of a kind layout.

Now that it is all stamped, I trimmed out the inside of the frame using an exacto knife and a metal ruler.  I cut the "straight" area's first, stopping when a straight line intersected with a curved area of the image. Then I went back and trimmed around the part of the image that exteded over the pencil line.  That's how I got the unique shape on the inside and outside border.  I used a stipple brush to add red ink and distress.  I also traced around some of the swirls and inside the florals with red prismacolor pencil and blended with OMS to add some color.


2 more close-ups


I used Glimmer Chips on corners and here.  I think the patterned paper is Creative Imaginations as well.


Card
For this card I stamped the image on a Creative Imaginations Patterned Paper Frame.  I used Copics to color with.  I think the Creative Imaginations frame works great to create a romantic mood.


Thanks so much for checking out my blog!  I hope you are inspired to create this week!

Monday, October 26, 2009

Crafty Secrets Baby Girl Card and Layout

Hi ladies.  Today I'm posting a  Layout I created using one of my Crafty Secrets Stamp Sets - Baby Girl Clear Art Stamp Set.  Check out the actually stamp set at the bottom of the post, so you can see how I used it.


Frame and Masking Tutorial
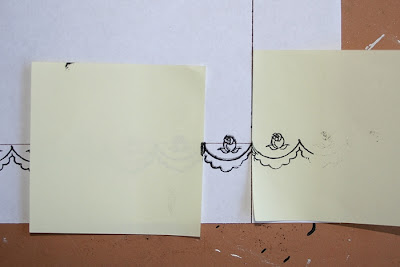
I began with my photo and matted it.  Next I had to determine the width of the frame around the photo.  The sides had to match the width of a series of the scallops if I wanted to finish the corners nicely.  If you take a look at the photo of the stamps for this set, you will see that the scalloped image as 6 scallops.  I stamped the image twice on a piece of scrap paper, end to end to help figure the measurements of the frame. 


I liked 7 scallops across by 10 scallops vertically.  So I measured across from edge to edge for 7 scallops, that equaled just short of 4", and again from edge to edge for 10 scallops - 5 5/8".  So now I had my measurement for my guidelines of the frame.  I cut a piece of white cardstock 6" x 7.5"  and penciled in my guidelines, creating a 4 x 5 5/8" rectangle (I used a pen on mine so it would show up for the photo).  You want the pencil lines light enough so that you can go back later and erase it.  When I am drawing squares or rectangles I use a tool called a t-square.  It is a drafting tool that allows you to have perfectly aligned edges.  And you can read more about how to use it HERE


So now I'm ready to stamp the scalloped border. 
In order to stamp the image along the penciled line, you need to mount your stamp on an acrylic block with lines on it.


You will line the white line on the block with the penciled line on the paper.  You might want to practice a couple of times before stamping on your project.  Practice by drawing a pencil line on a scrap piece of paper and see if you can stamp your image along that line.  Standing up over the stamp/block, helps you to be able to line it up.  Once you are confident you have that skill down, you are ready to stamp around your guidelines. Start in the left lower corner and stamp the first 6 scallops. 


In order to stamp just one more scallop, you have to mask off the 2 ends as shown below.  I know mines a little messy, but I was in a hurry to finish these tutorial photo's.


Take the post-it note mask off and stamp up the right side 6 more scallops.


Mask off 2 ends so that you can stamp 4 scallops to equal 10 up the right side.


Remove the mask and stamp 6 scallops along the top.


You will continue masking and stamping around the frame until you finish down the left side.

Here are some more details.  I love using stamped images to create my own little embellishments!


Patterned Paper : Crafty Secrets, Daisy D, Flower Bazzill
Ribbon Hobby Lobby, Spellbinders scalloped dies, Deckeled sissors

Monday, October 12, 2009

Crafty Secrets Thanksgiving Layout


Good Morning.  Here is a Thanksgiving Layout using the same Crafty Secrets Stamp set I showed you on Saturday.  I love fall and Thanksgiving, so this one was a lot of fun to create.  Hope you like it.  See details below as well as a link to where you can get this stamp set!  Thanks soooo much for taking the time to check out my projects.  Have a great week!


Frame Tutorial
This frame is easy, but requires alot of detailed cutting.  But I think it was worth it.  I use cuticle scissors when doing detailed cutting like this along the curvy area's.  The curve of the cuticle scissors just makes it easy to get around, especially in small spaces.  I simple stamped the image from this set (see photo below) on cardstock, colored and trimmed.  I layered the felt flourish trim around the photo first, then layered my stamped images over that using pop dots.  Stretch those creative muscles and think about how you can combine images from a set to create a frame.  I think you will like the results!

Paper : Crafty Secrets DP (beige), Daisy D DP (green), beige and dark brown cardstock
Ink : VersaFine with Clear Embossing Powder for all images, Palette Burnt Umber to distress edges of DP using eyeshadow applicator.
Other : Velvet Class A' Peel Stickers by Stampendous, Ribbon - unknown.  Corrugated cardboard painted dark brown using acrylic paint.  Cuticle scissors used to cut around images and pop dots to pop up some of the frame.  Deckled scissors by Fiskar.
Colorization : Prismacolor Pencils and OMS with Shimmerz.


Monday, August 31, 2009

Crafty Secrets - Bird Notes Layout

I have gone shabby chic crazy!! I love it! I've always wanted to try it and I love it! Last week I even hit local used book stores and vintage stores for emphemera (I really hate this word btw. How the heck to you say it? I need to do a word search.). I hit the jack pot and can't wait to go hunting again!! For today's post I'm sharing an 8x8 layout using my "Bird Notes" Crafty Secrets stamp set. The patterned paper is from Heartwarming Vintage - Classic Paper Pad. I created a card with this set last week. If you missed it, just scroll down a few post. See the details below of the stamped images I used!

So more about the layout. First off this is my little guy, you used to make my heart sing when he was the little cutie in this photo. But time flies, and then the grow up, now he's 21 and he makes my head want to explode!! Yes he still lives at home, rarely cleans his room and lets his laundry pile up. His room smells like stinky socks, yuck. I prefer to remember him as above, hehe!!
I gotta tell you about some of the stuff on this layout. On my shabby chic treasure hunt I came across this old music paper from 1920!!!!! Score! and the books cost $1 each! I also came across a huge bag of buttons for $12. Now that may sound like alot, but have you priced dressy buttons lately? This was definitely a deal. I don't know how old they are, but the button card said they were made by "Exquisit" and the original price was .29cents. I'm saving the button card to use on another project.
Other supplies : Sizzix Embossing Folders - came as a 3set. I couldn't find it online. I got mine at a local craft store. Stick pins - Prima. Blue Ribbon - Creative Imaginations. Beige Ribbon - notions department at Joanns Craft Store. Ink - Brilliance Pearlescent Chocolate. I LOVE this ink pad!
Techniques : I brushed Tattered Angels Creme de Chocolate over watercolor paper. I love that shimmery look and it worked perfect with the embossing folders. I sanded a little and walla!
My daughter plays violin so I have a few musical embellishments stored away. I used a wooded music note to trace the treble clef pattern on the back of my Hearwarming Vintage paper and cut it out. I inked the edges of almost everything with brown ink.
You can get Heartwarming Vintage Collection and Crafty Secrets Vintage stamps HERE.
Check out there blog HERE.

Friday, August 28, 2009

Crafty Secrets Christmas Joy Layout


Good Morning Ladies. This morning I want to share with you a old photo from waaayyyy back in 1971. Man I'm getting old. We were about 5 and 6 years old here. I will be 44 soon. This is me and my brother (who is no longer alive) standing in front of our very modest christmas tree complete with the shiney tinsel and plastic angel on top. My mom told me last night that even the curtains on the window were plastic. But we didn't care. Look at the huge smiles on our faces! What you can't see is that one of my brother's shoes was untied. Seeing this gave me a little smile, although my mom dressed him up and combed his hair perfectly for this photo, a little peice of his imperfect personality is shining through in that untied shoe, hehe. He was a stinker!! He got is so much trouble. Typical boy!

8x8 Layout
Patterned Paper : My Little Yellow Bicycle Ribbon : notions section at Joann's
Spellbinders Labels One S4-161 for frame Swirls : Quickutz Die
Red Stickles
Wooowhoooo!! I have created at least one project with all my Crafty Secrets sets! That means I've earned the right to order MORE!! I've already scoped out my next 2 sets!! Yesterday I ordered some of there Heartwarming Vintage Paper/Cut out sets. I can't wait to get them. I found the cutest black and white easter photo of me and my brother that I want to scrap! No one sells them locally so I order mine online. If you are interested in Crafty Secrets Stamps sets or Heartwarming Vintage paper products, you can get them HERE! At least for now. I read that they are working on a new site due to be up and running by the end of next month!
Related Posts Plugin for WordPress, Blogger...